Overview
MoneyGoWhere is a personal finance application targeted at students at the National University of Singapore (NUS), designed by my team and I for our Software Engineering project. It was morphed from a basic command line AddressBook-Level3 application.
Some notable features include setting budget goals, viewing statistics, customised searching and sorting, setting reminders for bills, viewing exchange rates, changing the application currency and importing and exporting data from and to a Csv file.
My Role
I was tasked to complete import and export feature, as well as to enhance the Graphical User Interface (GUI) to be more user-friendly. I have also made notable contributions to the User Guide and Developer Guide.
Listed below are some notations that are used throughout the document.
Icon |
Description |
|
Command that can be executed |
|
Tips that might be helpful in navigating the application |
|
Important information that should be noted |
If there are any additional related information, it will be described in a block below:
Useful information for a deeper understanding of the command.
These icons and their following descriptions enable greater clarity in understanding the document.
Summary of contributions
This section shows a summary of my contributions to the team project.
Major Enhancement: Import & Export Features
-
What it does: It allows the user to save his spending data in an external file and modifies the data before importing it back into the application. It also allows the user to change between computers without a fear of losing his spending data.
-
Justification: This feature improves the product significantly as the user may have existing data before starting to use the application and to export the spending data if he would like to change between multiple computers.
-
Highlights: This enhancement functions well with existing commands as it adds more spending into the list, all the other features such as budget, graph and statistics are updated as well. It required an in-depth analysis of design alternatives.
-
Credits: Jackson.
Minor Enhancement: Redesigned User Interface
-
What it does: This enhancement allows the application to have a better-looking, more user-friendly colour theme as well as allows the application window size to be resizeable.
-
Justification: As the application is targeting to solve a financial problem, I figure it would be better to have a light theme coupled with a green colour scheme as opposed to the dark theme given by the base project, AddressBook-Level3.
-
Highlights: When the application window is resized, all components in the application is resized as well according to the window size. This allows the application to still be usable even after the window size is resized.
Other contributions
-
Project management
-
Guided teammates for tips and tricks in regards to using JavaFX and FXML.
-
-
Enhancements to existing features:
-
Documentation:
-
Community:
-
PRs reviewed (with non-trivial review comments): #106
-
Contributions to the User Guide
Listed below are sections I contributed to the User Guide. This includes the Features section, particularly the Import and Export section. |
Importing data : import
The purpose of this command is to let you import external spending data from a Csv file.
When you want to import your existing spending data which is recorded in a Csv file,
you could type a simple command, in the format of import p/FILE_PATH, and press enter.
Your new spending entries will be added to the existing spending entries without replacing them.
The Graph, Statistics and Budget panels will also be updated accordingly once the import is successful.
|
Only spending data will be imported. This excludes Reminder and Budget data. However, importing of Reminder and Budget data is coming in our version 2.0! |
Format: import p/FILE_PATH
Examples:
-
import p/data.csv -
import p/C:\Users\User\Documents\spending.csv -
import p/./data.csv
Retrieving File Path
You could retrieve your file path by following these steps, depending on which Operating System you are on:
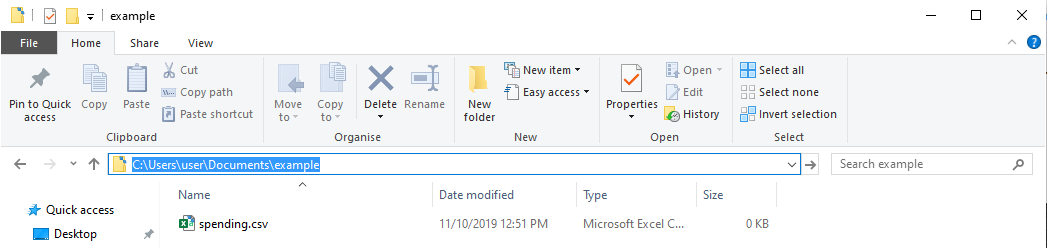
For Windows:
-
Open your File Explorer.
-
Navigate to the folder where you save your Csv file.
-
Click on the address bar of your File Explorer window.
-
You should be able to see something similar to the figure above.
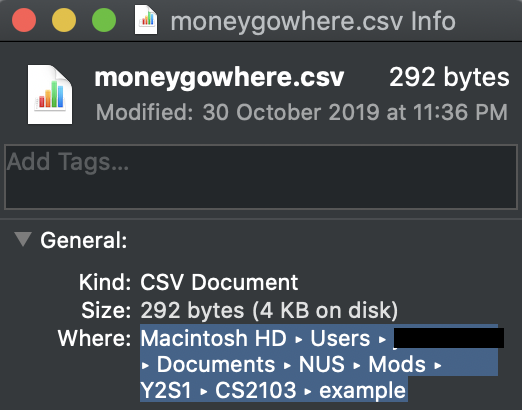
For Mac:
-
Open your Finder window.
-
Navigate to the folder where you sove your Csv file.
-
Right-click on your Csv file and select
Get Info. -
You should be able to see a window open up showing something similar to the figure above.
Csv File Constraints

Before importing your Csv file, you have to make sure that your Csv file have a header row with the following values:
-
name
-
date
-
remark
-
cost
-
tagged
You should end up with a Csv file similar to the figure above.
Multiple tags should be separated by a semi-colon.
Example:
juicy;nice
Alternatively, tags could be wrapped in double quotes and separated by commas.
Example:
"juicy,nice"
Expected Output:
Data from the Csv file is imported, keeping existing spending entries.
Exporting data : export
The purpose of this command is to let you export your spending data to a
moneygowhere.csv file at a folder that you like. You could refer to Retrieving File Path.
|
Only spending data will be exported into However, exporting of Reminder and Budget data is coming in our version 2.0! |
Format: export p/FOLDER_PATH
Examples:
-
export p/Documents -
export p/Finance -
export p/C:\Users\user\Documents\MoneyGoWhere
Contributions to the Developer Guide
Listed below are sections I contributed to the Developer Guide. This includes the features section for Import and Export, and the components for UI, model and storage section. |
Import feature
|
The current implementation only imports spending data. Coming in version 2.0, |
Implementation
The import feature allows our users to import data from a comma-separated values (Csv) files. It allows users to add their spending in bulk.
Given below is the Sequence Diagram for interactions within the Logic component for the
execute("import p/validSpending.csv")
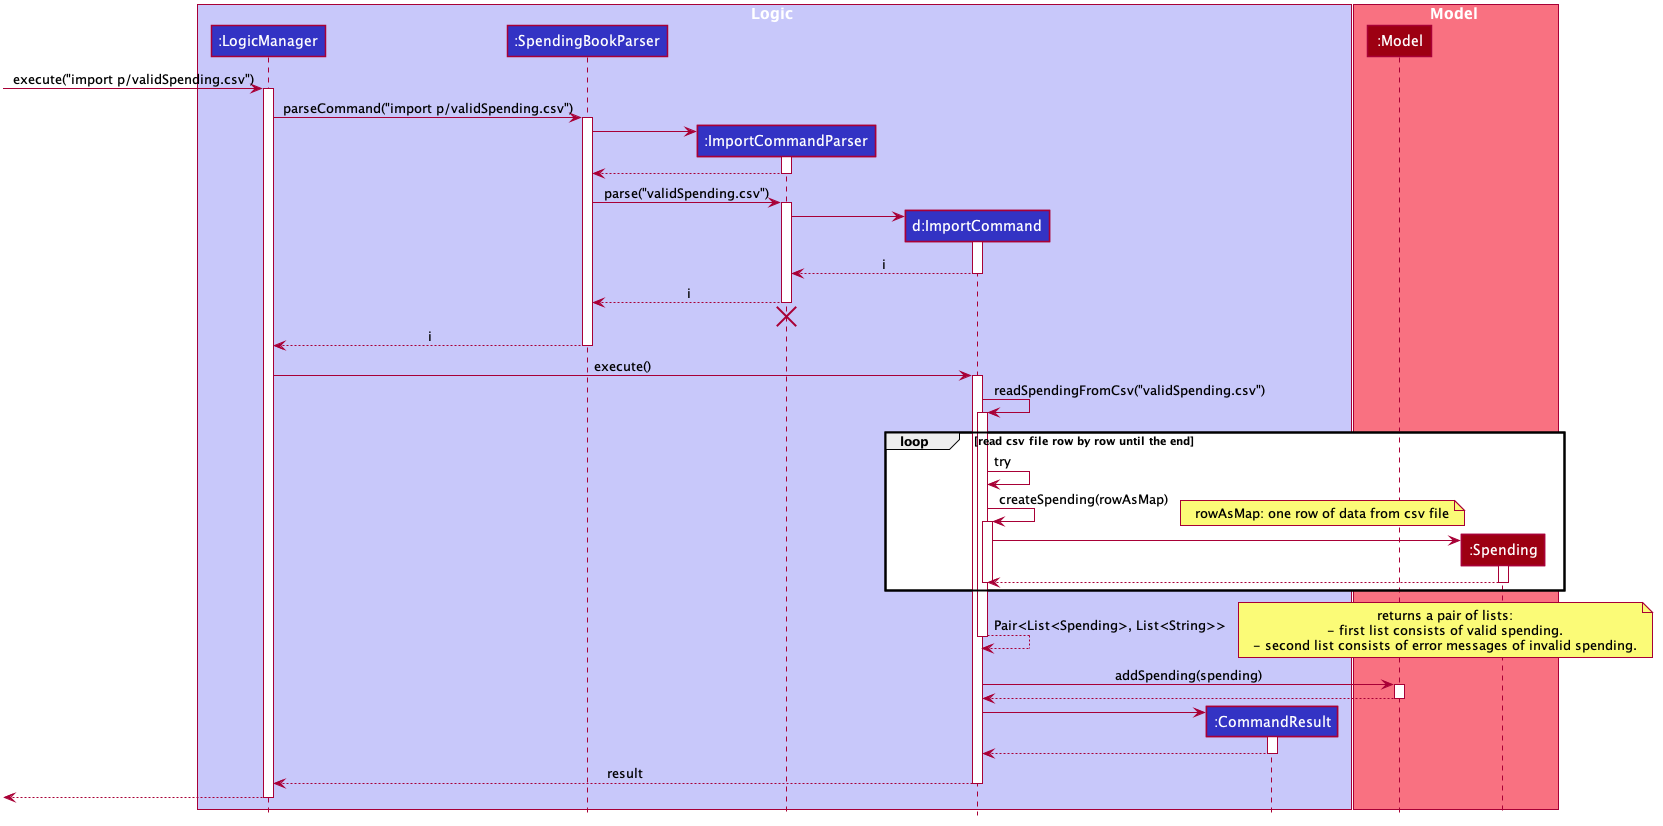
import CommandThe Import Feature has one main component, which is the ImportCommand.java file. This file contains the main logic behind the feature.
The ImportCommand#readSpendingFromCsv() method utilises the FasterXML/jackson library to read in Csv files and convert it into maps of objects.
The maps will then be processed and parsed into Spending objects which will be added into a Spending list.
Those maps that do not pass the parse conditions will then be thrown as an exception and its message will be saved inside an error list.
After all the maps are processed, the application will then go through the valid spending list and save them by calling the Model#addSpending() method.
Following that, the application will then prints an output, showing the result of the command execution.
The following activity diagram summarizes what happens when a user executes an import command:
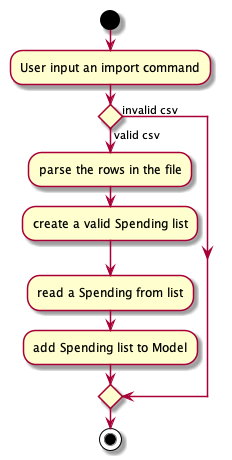
When a user calls the import command and inputs a valid Csv file, the application will read and parses all the data inside the file and save them to the SpendingBookList and moneygowhere.json.
Csv File Format and Constraints
In order for data to be imported into MoneyGoWhere, it must be in a properly formatted Csv file.
There should be 5 columns specified for Name, Cost, Date, Tag and Remark
Header Constraints
-
The first row is read in as the header and is required.
Cell Formatting
-
There should not be any leading and trailing spaces in a cell.
-
To specify a comma within a cell, the value of the cell should be inside double quotes. Eg:
-
"yummy, juicy"
-
"fresh, clean"
-
-
To specify double quotes within a cell, in addition to start and end double quotes, escape the double quote with another double quote. Eg:
-
"""yummy"", ""juicy"""
-
"""fresh"", ""clean"""
-
Design Considerations
| Aspect | Alternative 1 (current choice) | Alternative 2 |
|---|---|---|
How import executes |
Imports the entire Csv file, converts all the rows into a list of Pros: |
Imports the Csv file, converts all the rows into a list of Pros: |
Alternative 1 was chosen as it gives a much better performance as opposed to alternative 2. At first alternative 2 was chosen as it was easier to implement. However, performance issues was detected when importing more than 50 spending and when importing more than 1000 spending, the whole application stops responding.
Hence, alternative 1 was implemented and now the application could handle large amount of spending without a noticeable sluggishness in performance.
Export feature
|
The current implementation only exports spending data. Coming in version 2.0, |
Implementation
The export feature allows our users to export their spending into a comma-separated values(Csv) files. It allows users to export their spending allowing the spending data to be portable.
Given below is the Sequence Diagram for the interactions withing the Logic component for the execute("export p/Documents")
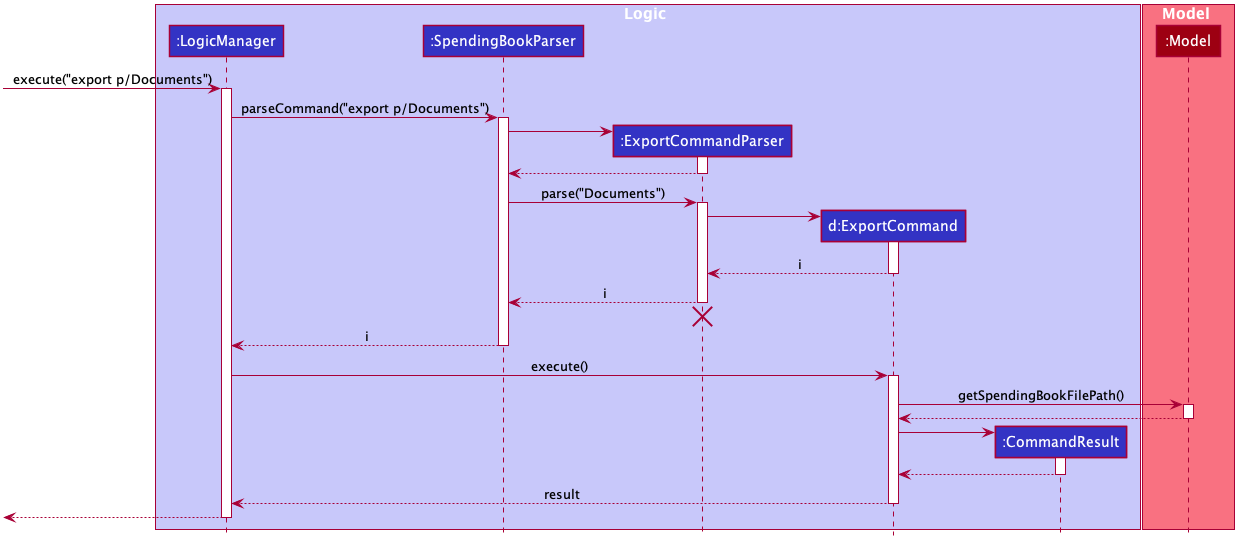
The export feature has one main component, which is the ExportCommand.java file. This file contains the main logic behind the feature.
The 'ExportCommand#execute()' method utilises the FasterXML/jackson library to read in the .json file where the application keeps the spending data.
After the data has been read successfully, it is converted and written into moneygowhere.csv file. This file will be created at wherever the user specifies.
After the data has been successfully exported, the application will then prints an output, showing the result of the command execution.
The following activity diagram summarizes what happens when a user executes an export command:
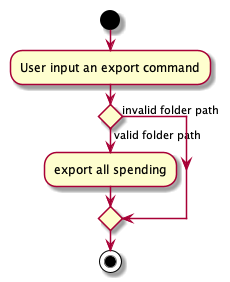
When a user calls the export command and inputs a valid folder path, the application will convert all the spending data into a Csv file and export it to moneygowhere.csv