By: Team CS2103T-F13-3 Since: Sep 2019 Licence: MIT
- 1. Introduction
- 2. How To Use This Guide
- 3. Setting up
- 4. Design
- 5. Implementation
- 6. Documentation
- 7. Testing
- 8. Dev Ops
- Appendix A: Product Scope
- Appendix B: User Stories
- Appendix C: Use Cases
- Appendix D: Non Functional Requirements
- Appendix E: Glossary
- Appendix F: Instructions for Manual Testing
- F.1. Launch and Shutdown
- F.2. Deleting a Spending
- F.3. Finding a Spending
- F.4. Sorting Displayed Spending
- F.5. Changing the Displayed Currency
- F.6. Viewing Exchange Rate or Conversion Rate
- F.7. Adding a Reminder
- F.8. Deleting a Reminder
- F.9. Importing Spending Data
- F.10. Exporting Spending Data
- F.11. Showing Statistics
- F.12. Showing Graph
- F.13. Setting a New Budget
- F.14. Viewing Previous Commands
- F.15. Viewing Next Commands
1. Introduction
MoneyGoWhere is a personal finance application targeted to students at the National University of Singapore (NUS). It allows students to keep track of all their spending and their related information such as date, cost and tags. Users can also set budget goals, view statistics, set reminders for bills, view exchange rates, use different currencies, and import and export their data. With an easy-to-use Graphical User Interface (GUI) and employment of Command Line Interface (CLI), users can easily navigate through the application, contributing to its user-friendliness and efficiency.
2. How To Use This Guide
The following section details and previews a few legends and formatting that will be used throughout the user guide. These legends are used to represent special information such as tips.
| Important information that should be noted. |
| Tips that can help you better navigate the application. |
test: Command to be executed, or a component, class or object in the architecture of the application.
Useful information for a deeper understanding of the command.
3. Setting up
3.1. Prerequisites
-
JDK
11or above -
IntelliJ IDE
IntelliJ by default has Gradle and JavaFx plugins installed.
Do not disable them. If you have disabled them, go toFile>Settings>Pluginsto re-enable them.
3.2. Setting up the project in your computer
-
Fork this repo, and clone the fork to your computer
-
Open IntelliJ (if you are not in the welcome screen, click
File>Close Projectto close the existing project dialog first) -
Set up the correct JDK version for Gradle
-
Click
Configure>Project Defaults>Project Structure -
Click
New…and find the directory of the JDK
-
-
Click
Import Project -
Locate the
build.gradlefile and select it. ClickOK -
Click
Open as Project -
Click
OKto accept the default settings.
3.3. Verifying the setup
-
Run the
seedu.moneygowhere.Mainand try a few commands -
Run the tests to ensure they all pass.
3.4. Configurations to do before writing code
3.4.1. Configuring the coding style
This project follows oss-generic coding standards. IntelliJ’s default style is mostly compliant with ours but it uses a different import order from ours. To rectify,
-
Go to
File>Settings…(Windows/Linux), orIntelliJ IDEA>Preferences…(macOS) -
Select
Editor>Code Style>Java -
Click on the
Importstab to set the order-
For
Class count to use import with '*'andNames count to use static import with '*': Set to999to prevent IntelliJ from contracting the import statements -
For
Import Layout: The order isimport static all other imports,import java.*,import javax.*,import org.*,import com.*,import all other imports. Add a<blank line>between eachimport
-
Optionally, you can follow the UsingCheckstyle.adoc document to configure Intellij to check style-compliance as you write code.
3.4.2. Updating documentation to match your fork
After forking the repo, the documentation will still have the SE-EDU branding and refer to the AY1920S1-CS2103T-F13-3/main repo.
If you plan to develop this fork as a separate product (i.e. instead of contributing to AY1920S1-CS2103T-F13-3/main), you should do the following:
-
Configure the site-wide documentation settings in
build.gradle, such as thesite-name, to suit your own project. -
Replace the URL in the attribute
repoURLinDeveloperGuide.adocandUserGuide.adocwith the URL of your fork.
3.4.3. Setting up CI
Set up Travis to perform Continuous Integration (CI) for your fork. See UsingTravis.adoc to learn how to set it up.
After setting up Travis, you can optionally set up coverage reporting for your team fork (see UsingCoveralls.adoc).
| Coverage reporting could be useful for a team repository that hosts the final version but it is not that useful for your personal fork. |
Optionally, you can set up AppVeyor as a second CI (see UsingAppVeyor.adoc).
| Having both Travis and AppVeyor ensures your App works on both Unix-based platforms and Windows-based platforms (Travis is Unix-based and AppVeyor is Windows-based) |
3.4.4. Getting started with coding
When you are ready to start coding, we recommend that you get some sense of the overall design by reading about Section 2.1 Architecture.
4. Design
4.1. Architecture
The Architecture Diagram given above explains the high-level design of the App. Given below is a quick overview of each component.
The .puml files used to create diagrams in this document can be found in the diagrams folder.
Refer to the Using PlantUML guide to learn how to create and edit diagrams.
|
-
At app launch: Initializes the components in the correct sequence, and connects them up with each other.
-
At shut down: Shuts down the components and invokes cleanup method where necessary.
Commons represents a collection of classes used by multiple other components.
The following class plays an important role at the architecture level:
-
LogsCenter: Used by many classes to write log messages to the App’s log file.
The rest of the App consists of four components.
Each of the four components
-
Defines its API in an
interfacewith the same name as the Component. -
Exposes its functionality using a
{Component Name}Managerclass.
For example, the Logic component (see the class diagram given below) defines it’s API in the Logic.java interface and exposes its functionality using the LogicManager.java class.
How the architecture components interact with each other
The Sequence Diagram below shows how the components interact with each other for the scenario where the user issues the command delete 1.
delete 1 commandThe sections below give more details of each component.
4.2. UI component
API : Ui.java
The UI consists of a MainWindow that is made up of parts e.g.CommandBox, ResultDisplay, SpendingListPanel, StatusBarFooter, ReminderListPanel, etc. All these, including the MainWindow, inherit from the abstract UiPart class.
The UI component uses JavaFx UI framework. The layout of these UI parts are defined in matching .fxml files that are in the src/main/resources/view folder. For example, the layout of the MainWindow is specified in MainWindow.fxml
The UI component,
-
Executes user commands using the
Logiccomponent. -
Responds to the user’s keyboard and mouse input.
-
Listens for changes to
Modeldata so that the UI can be updated with the modified data.
4.3. Logic component
The following class diagram shows the structure of the Logic component.
API :
Logic.java
-
Logicuses theSpendingBookParserclass to parse the user command. -
This results in a
Commandobject which is executed by theLogicManager. -
The command execution can affect the
Model(e.g. adding a Spending). -
The result of the command execution is encapsulated as a
CommandResultobject which is passed back to theUi. -
In addition, the
CommandResultobject can also instruct theUito perform certain actions, such as displaying help to the user.
Given below is the Sequence Diagram for interactions within the Logic component for the execute("delete 1") API call.

delete 1 Command
The lifeline for DeleteCommandParser should end at the destroy marker (X) but due to a limitation of PlantUML, the lifeline reaches the end of diagram.
|
The following steps explain Figure 6, “Interactions Inside the Logic Component for the delete 1 Command”:
-
The user enters
delete 1. -
LogicManagercallsSpendingBookParser#parseCommand(). -
DeleteCommandParseris created. -
1is passed as an argument toDeleteCommandParser -
DeleteCommandis created and returns an objectd. -
On
execute(),Model#deleteSpending(1)is called to delete the spending from the list.
4.4. Model component
The following class diagram shows the structure of the Model component.
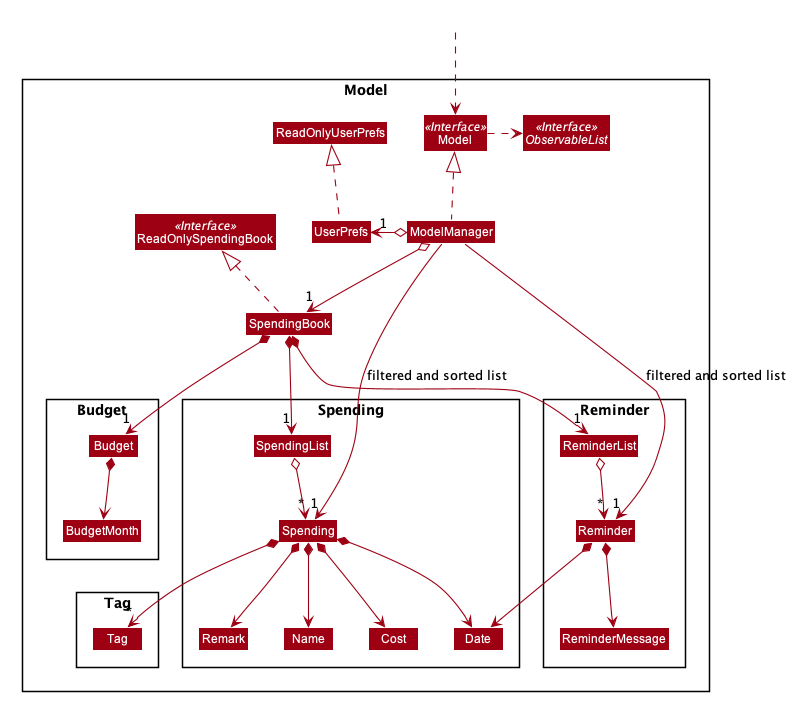
API : Model.java
The Model,
-
stores a
UserPrefobject that represents the user’s preferences. -
stores the Spending data.
-
stores the Reminder data.
-
stores the Budget data.
-
exposes an unmodifiable
ObservableList<Spending>andObservableList<Reminder>that can be 'observed' e.g. the UI can be bound to this list so that the UI automatically updates when the data in the list change. -
does not depend on any of the other three components.
As a more OOP model, we can store a Tag list in Spending Book, which Spending can reference. This would allow Spending Book to only require one Tag object per unique Tag, instead of each Spending needing their own Tag object. An example of how such a model may look like is given below.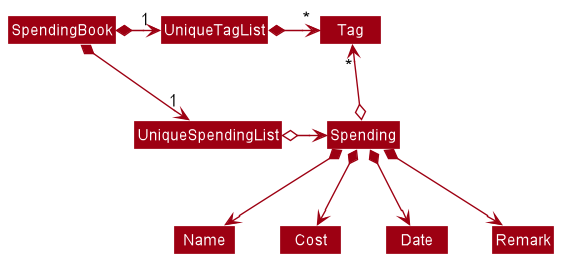
|
4.5. Storage component
The following class diagram below displays the structure of the Storage Component.
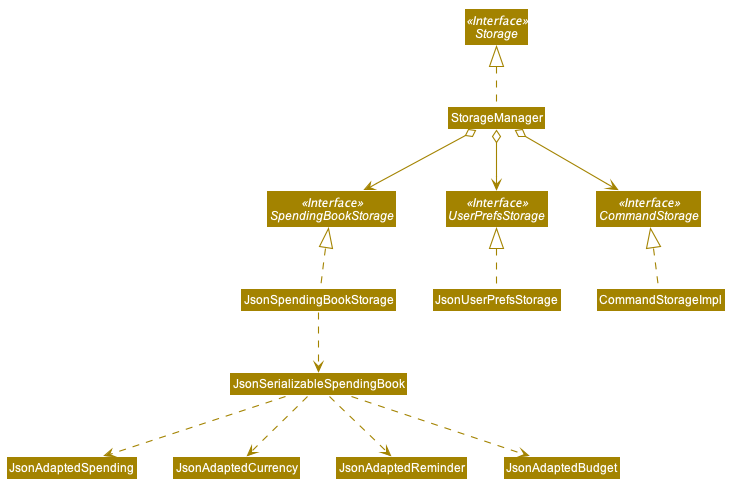
API : Storage.java
The Storage component,
-
can save
UserPrefobjects in json format and read it back. -
can save the Spending Book data in json format and read it back.
4.6. Common classes
Classes used by multiple components are in the seedu.moneygowhere.commons package.
5. Implementation
This section describes some noteworthy details on how certain features are implemented.
5.1. Logging
We are using java.util.logging package for logging. The LogsCenter class is used to manage the logging levels and logging destinations.
-
The logging level can be controlled using the
logLevelsetting in the configuration file (See Section 5.2, “Configuration”) -
The
Loggerfor a class can be obtained usingLogsCenter.getLogger(Class)which will log messages according to the specified logging level -
Currently log messages are output through:
Consoleand to a.logfile.
Logging Levels
-
SEVERE: Critical problem detected which may possibly cause the termination of the application -
WARNING: Can continue, but with caution -
INFO: Information showing the noteworthy actions by the App -
FINE: Details that is not usually noteworthy but may be useful in debugging e.g. print the actual list instead of just its size
5.2. Configuration
Certain properties of the application can be controlled (e.g user prefs file location, logging level) through the configuration file (default: config.json).
5.3. Command History Feature
Similar to a typical CLI, the up and down key allows the users to cycle through their previous commands.
5.3.1. Implementation
The up and down key mechanism is facilitated by the logic component of MoneyGoWhere.
Whenever a user inputs a command, it is stored internally in a list in CommandHistory component of Storage.
CommandHistory has an internal index to keep track of its current position in the list.
Additionally, it implements the following operations:
-
Logic#getNextCommand()— Retrieves the next user input command with respect to the current index. -
Logic#getPrevCommand()— Retrieves the previous user input command with respect to the current index.
The index is initially set to -1, to indicate that there has been no user input. Whenever a user inputs a command, the command is stored at the end of the list and the index is set to the size of the list, to indicate that there are no commands beyond after this point.
Calling getPrevCommand() will cause the index to decrement by 1 and show the user input command stored at that index.
When the index is currently 0, or the first user input, pressing the up key will cause the index to result in -1.
This returns the empty string, since there are no commands before this point. Any further up key press will have the same
outcome, but the index will stay at negative one.
Calling getNextCommand() will cause the index to increment by 1 and the user input at that index will be returned.
If the index is currently the last possible value, the last user input, pressing the down key will cause the
index to increment by 1, which is outside the list, the empty string will be returned. Any further down key press
will have the same outcome but the index will stay at the list size or one after the last possible index.
The following sequence diagram shows how the up/down key mechanism works:
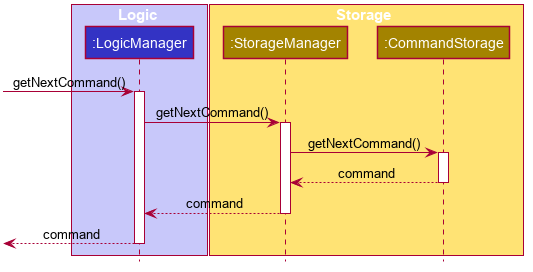
getNextCommand()
getPrevCommand() works the same way as the the sequence diagram above for getNextCommand().
The only difference is which commands get returned.
|
The following steps explain the sequence diagram:
-
The user presses the
downkey. -
LogicManagercallsStorageManager#getNextCommand(). -
StorageManager#getNextCommand()callsCommandHistory#getNextCommand() -
CommandHistoryreturns the next user input. -
The returned command is then showed to the user in the
CommandBox.
To summarize what determines the output when the user presses the down key:
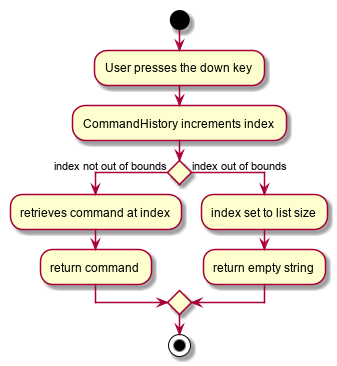
getNextCommand()The following steps explain the activity diagram:
-
The user presses the
downkey. -
CommandHistorywill increment its index. -
If the index is not out of bounds, the user input at the index will be returned
-
Else, the index is set to the size of the list, and an empty string is returned.
The sequence diagram and activity diagram for getPrevCommand() are similar to the sequence and activity diagram of getNextCommand() as shown above.
The only difference is whether it returns the next command or the previous command.
5.4. Find feature
The find feature allows the user to search for a spending based on specified fields. More fields may added to increase specificity. For example, find n/Apple c/2.50-3.00 will find an Apple of cost range $2.50 to $3.00.
5.4.1. Implementation
Find is supported by having a Predicate implemented for every field in Spending. Predicates are added based on valid input entered by the user. The FindCommandParser class stores these predicates, which are combined using Java 8 streams with an AND operation to form a more specific search query.
The sequence diagram below demonstrates how the find command is executed:
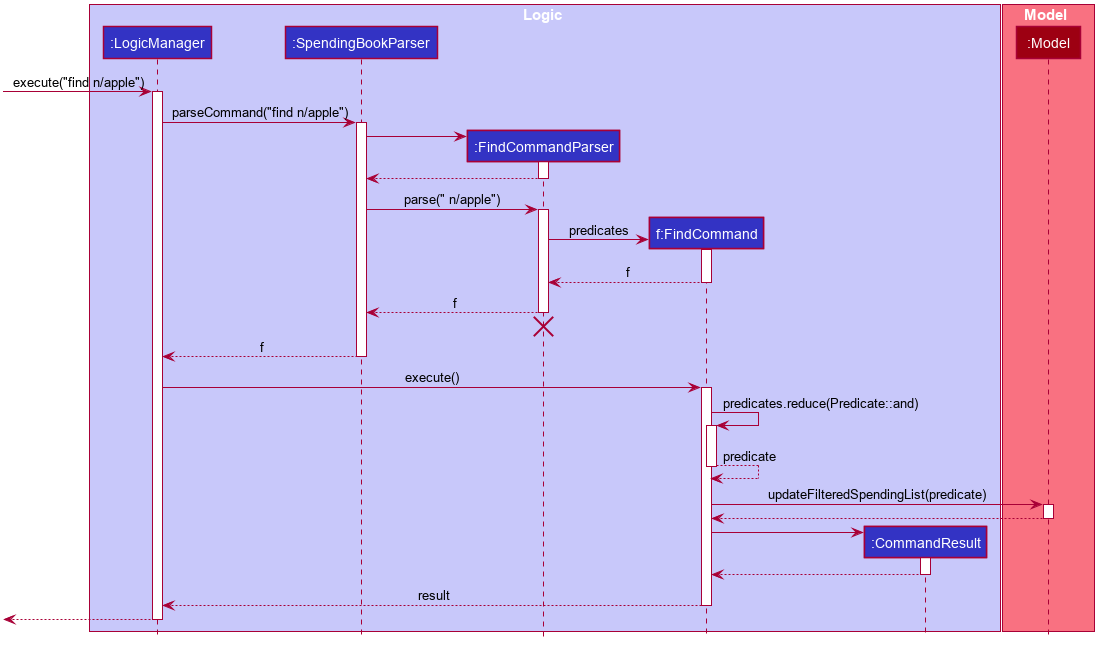
find commandThe following steps explain Figure 11, “Sequence diagram for an example find command”:
-
The user enters
find n/apple. -
LogicManagercallsSpendingBookParser#parseCommand(). -
FindCommandParseris created and validates user input, creating a list ofpredicates. -
FindCommandreceivespredicatesand stores it in a list. -
On
execute(),predicatesare reduced andModel#updateFilteredSpendingList(predicate)is called to refresh the displayed list.
The lifeline for FindCommandParser should end at the destroy marker (X) but due to a limitation of PlantUML, the lifeline reaches the end of diagram.
|
To summarise what happens when the user uses the find command, the following activity diagram is shown below:

find commandThe following steps explain Figure 12, “Activity diagram for an example find command”:
-
The user executes the
findcommand. -
If there are valid inputs, each field from the input is saved as predicates into a predicate list.
-
Else, there are two cases.
-
If there is an invalid field, display an error message for the invalid field.
-
If there is a missing field, display an error message for the missing field.
-
5.4.2. Design Considerations
Listed in the table below are the design considerations for the find command.
| Aspect | Alternative 1 (current choice) | Alternative 2 |
|---|---|---|
How find is executed |
Save all predicates to a list Cons: |
Access the underlying list and check all related objects. |
Based on Table 1, “Design considerations for find command”, Alternative 1 was chosen as it was the easiest to implement and obeys the Open-Closed Principle (OCP) of the SOLID principles. Although Alternative 2 enables checking of the related objects directly, it has poor abstraction and changes in the function require prior knowledge of the structure of the entire code, making it difficult to implement.
5.5. Sort feature
The sort feature allows users to sort all currently displayed Spending entries automatically using the sort command. The default sorting sequence is by: Date (Descending), Cost (Descending), Name (Ascending) and Remark (Ascending).
For example, sort n/ASC d/DESC applies sorting by name in ascending order, followed by Date in descending order. This applies to any future commands entered.
5.5.1. Implementation
The sorting feature is supported by SpendingComparator, a custom comparator to facilitate different sort ordering, and implements the following operation:
-
updateSortedSpendingList(comparator)— Updates the sorted spending list with a new comparator.
This operation is exposed in the Model interface as Model#updateSortedSpendingList(comparator).
At a high level view, SpendingComparator and SortField interacts in the manner shown below.

As shown in Figure 13, “High-level view of package interaction”, SortCommand has an association to SortField and a dependency to SpendingComparator.
The sequence diagram below demonstrates how the sort command is executed:
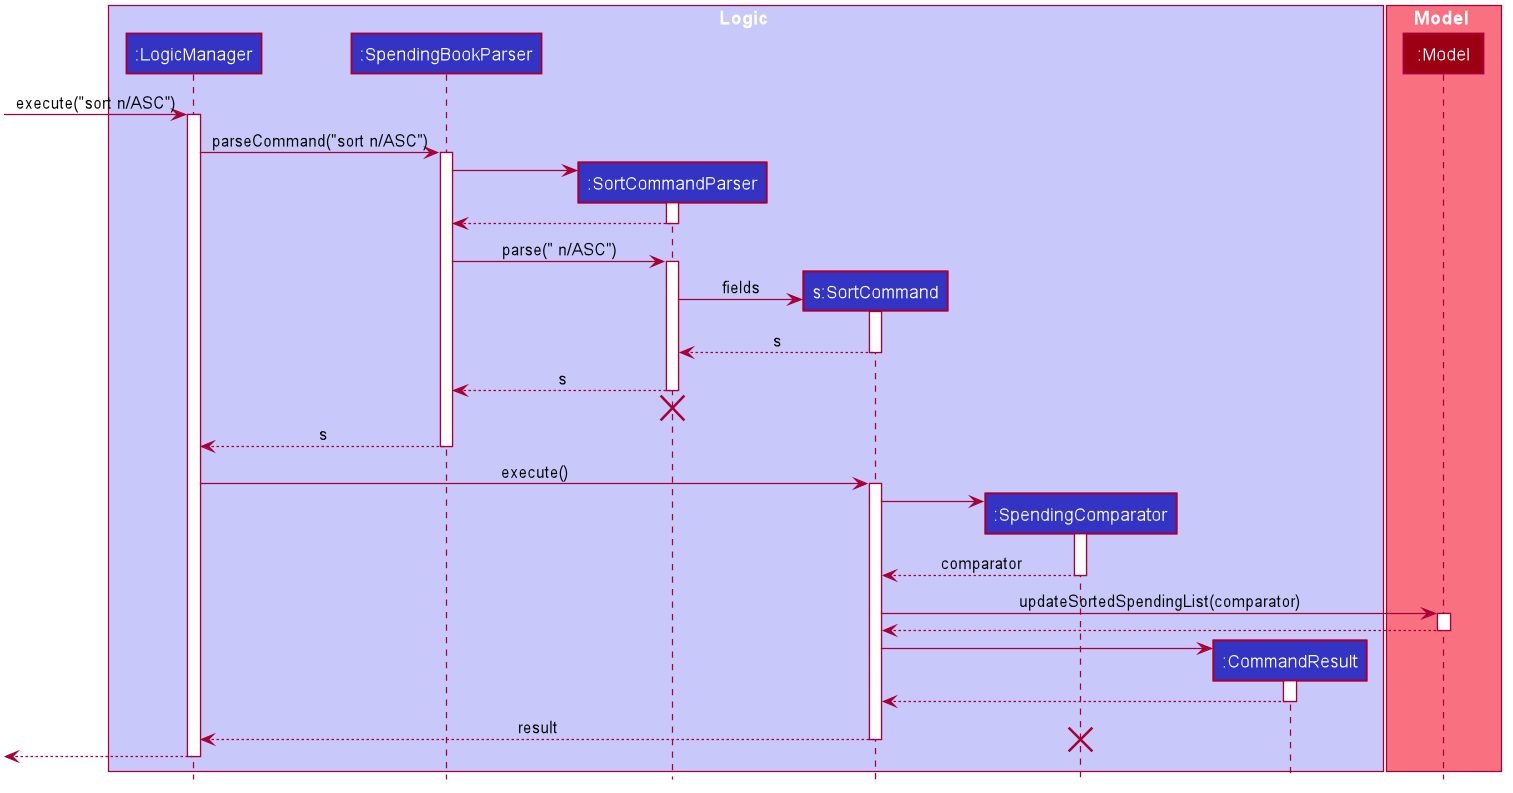
sort commandThe following steps explain Figure 14, “Sequence diagram for an example sort command”:
-
The user enters
sort n/ASC. -
LogicManagercallsSpendingBookParser#parseCommand(). -
SortCommandParseris created and validates user input, creating a set offields. -
SortCommandreceivesfieldsand stores it. -
On
execute(),fieldsare passed into aSpendingComparatorobject andModel#updateSortedSpendingList(comparator)is called to refresh the displayed list.
The lifeline for SortCommandParser should end at the destroy marker (X) but due to a limitation of PlantUML, the lifeline reaches the end of diagram.
|
The following activity diagram summarises what happens when the user uses the sort command:
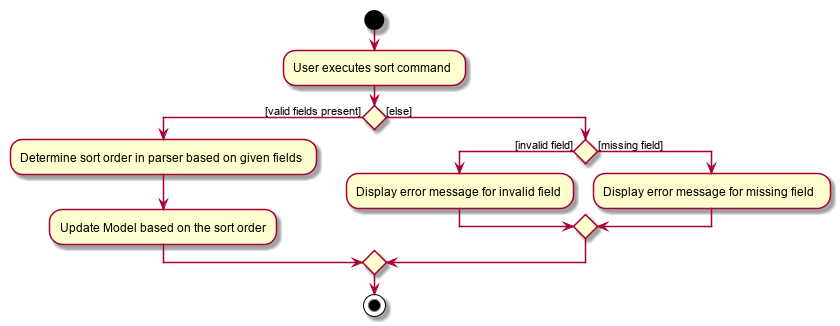
sort commandThe following steps explain Figure 15, “Activity diagram for an example sort command”:
-
The user executes the
sortcommand. -
If there are valid fields from the input, each field is saved into a list and determines sort order for
Model. -
Else, there are two cases.
-
If there is an invalid field, display an error message for the invalid field.
-
If there is a missing field, display an error message for the missing field.
-
5.5.2. Design Considerations
| Aspect | Alternative 1 (current choice) | Alternative 2 |
|---|---|---|
How sort is executed |
Set a new comparator |
Sort the underlying list without a comparator |
Method design for sort |
Create filtered list from sorted list |
Create sorted list from filtered list |
Based on Table 2, “Design considerations for sort command”, Alternative 1 was chosen as it was the easiest to implement and it does not violate Single Responsibility Principle (SRP) of the SOLID framework. The only downside of this approach is that changing any field classes may require modifying SpendingComparator.
In contrast, for Alternative 2, manipulating the internal elements of the list directly is dangerous and can cause unintended side effects. There was also a huge difference for the method design for sort, and Alternative 1 was the easier approach to avoid side effects in Alternative 2.
5.6. Reminder feature
This feature allows users to set reminders for their tasks with a specified deadline and delete them when respective tasks are completed.
5.6.1. Implementation for Reminder
In this feature, a reminder is constructed with following two key information as attributes.
-
deadline(Deadline of a task) -
reminderMessage(Message to inform user)
With the given deadline from users, the following two attributes are created further in the reminder constructor.
-
type(Type of reminder e.g. Overdue) -
remainingDays(Remaining days before deadline)
The purpose of the above two attributes are for sorting reminders based on the number of days between current date and their deadline in ascending order.
These two attributes are also utilized in formatting how a reminder should be displayed on the UI components.
The following class diagram illustrates the summary of the reminder class.

As indicated in the above diagram, a reminder uses the Date class from spending package as deadline attribute, therefore, it is also supported with Natural Language Processing (NLP).
Since the remainingDays attribute is of long data type, it is not included in the above diagram.
|
5.6.2. Implementation for Adding Reminder
First of all, for the user to add reminders into MoneyGoWhere, the following command is made available.
-
Adding a reminder
reminder add d/DATE m/MESSAGE
e.g.reminder add d/30/08/2020 m/Pay school fee- set reminder to pay school fee by 30th of August 2020
In this command, the parameter values lead by the prefixes are String values and parser will convert these values into acutual Date and ReminderMessage objects later on.
Below is the activity diagram describing the steps take by MoneyGoWhere when it receives AddReminderCommand.
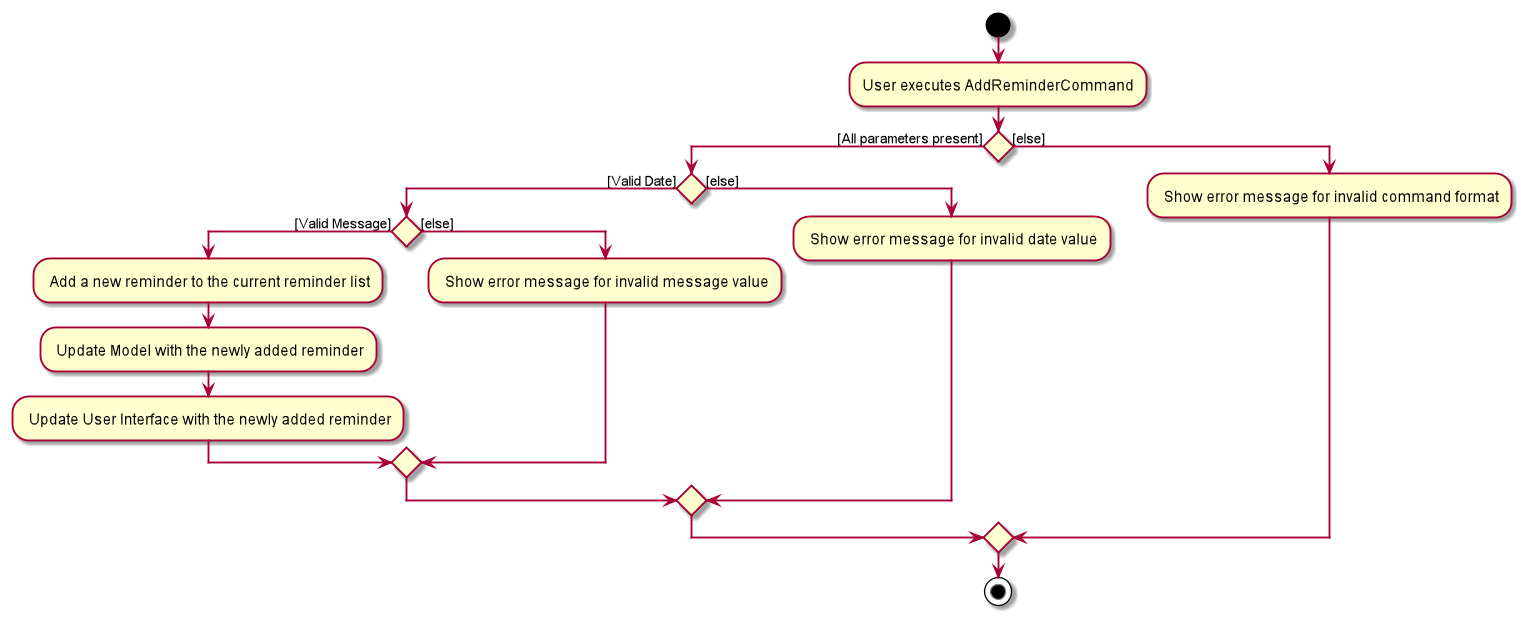
| In the above diagram, it can be seen that a reminder input from user will only be recorded after it passes all the validation checks. |
To illustrate how a reminder is added to the Model component when the user enters AddReminderCommand, the sequence diagram is shown below.
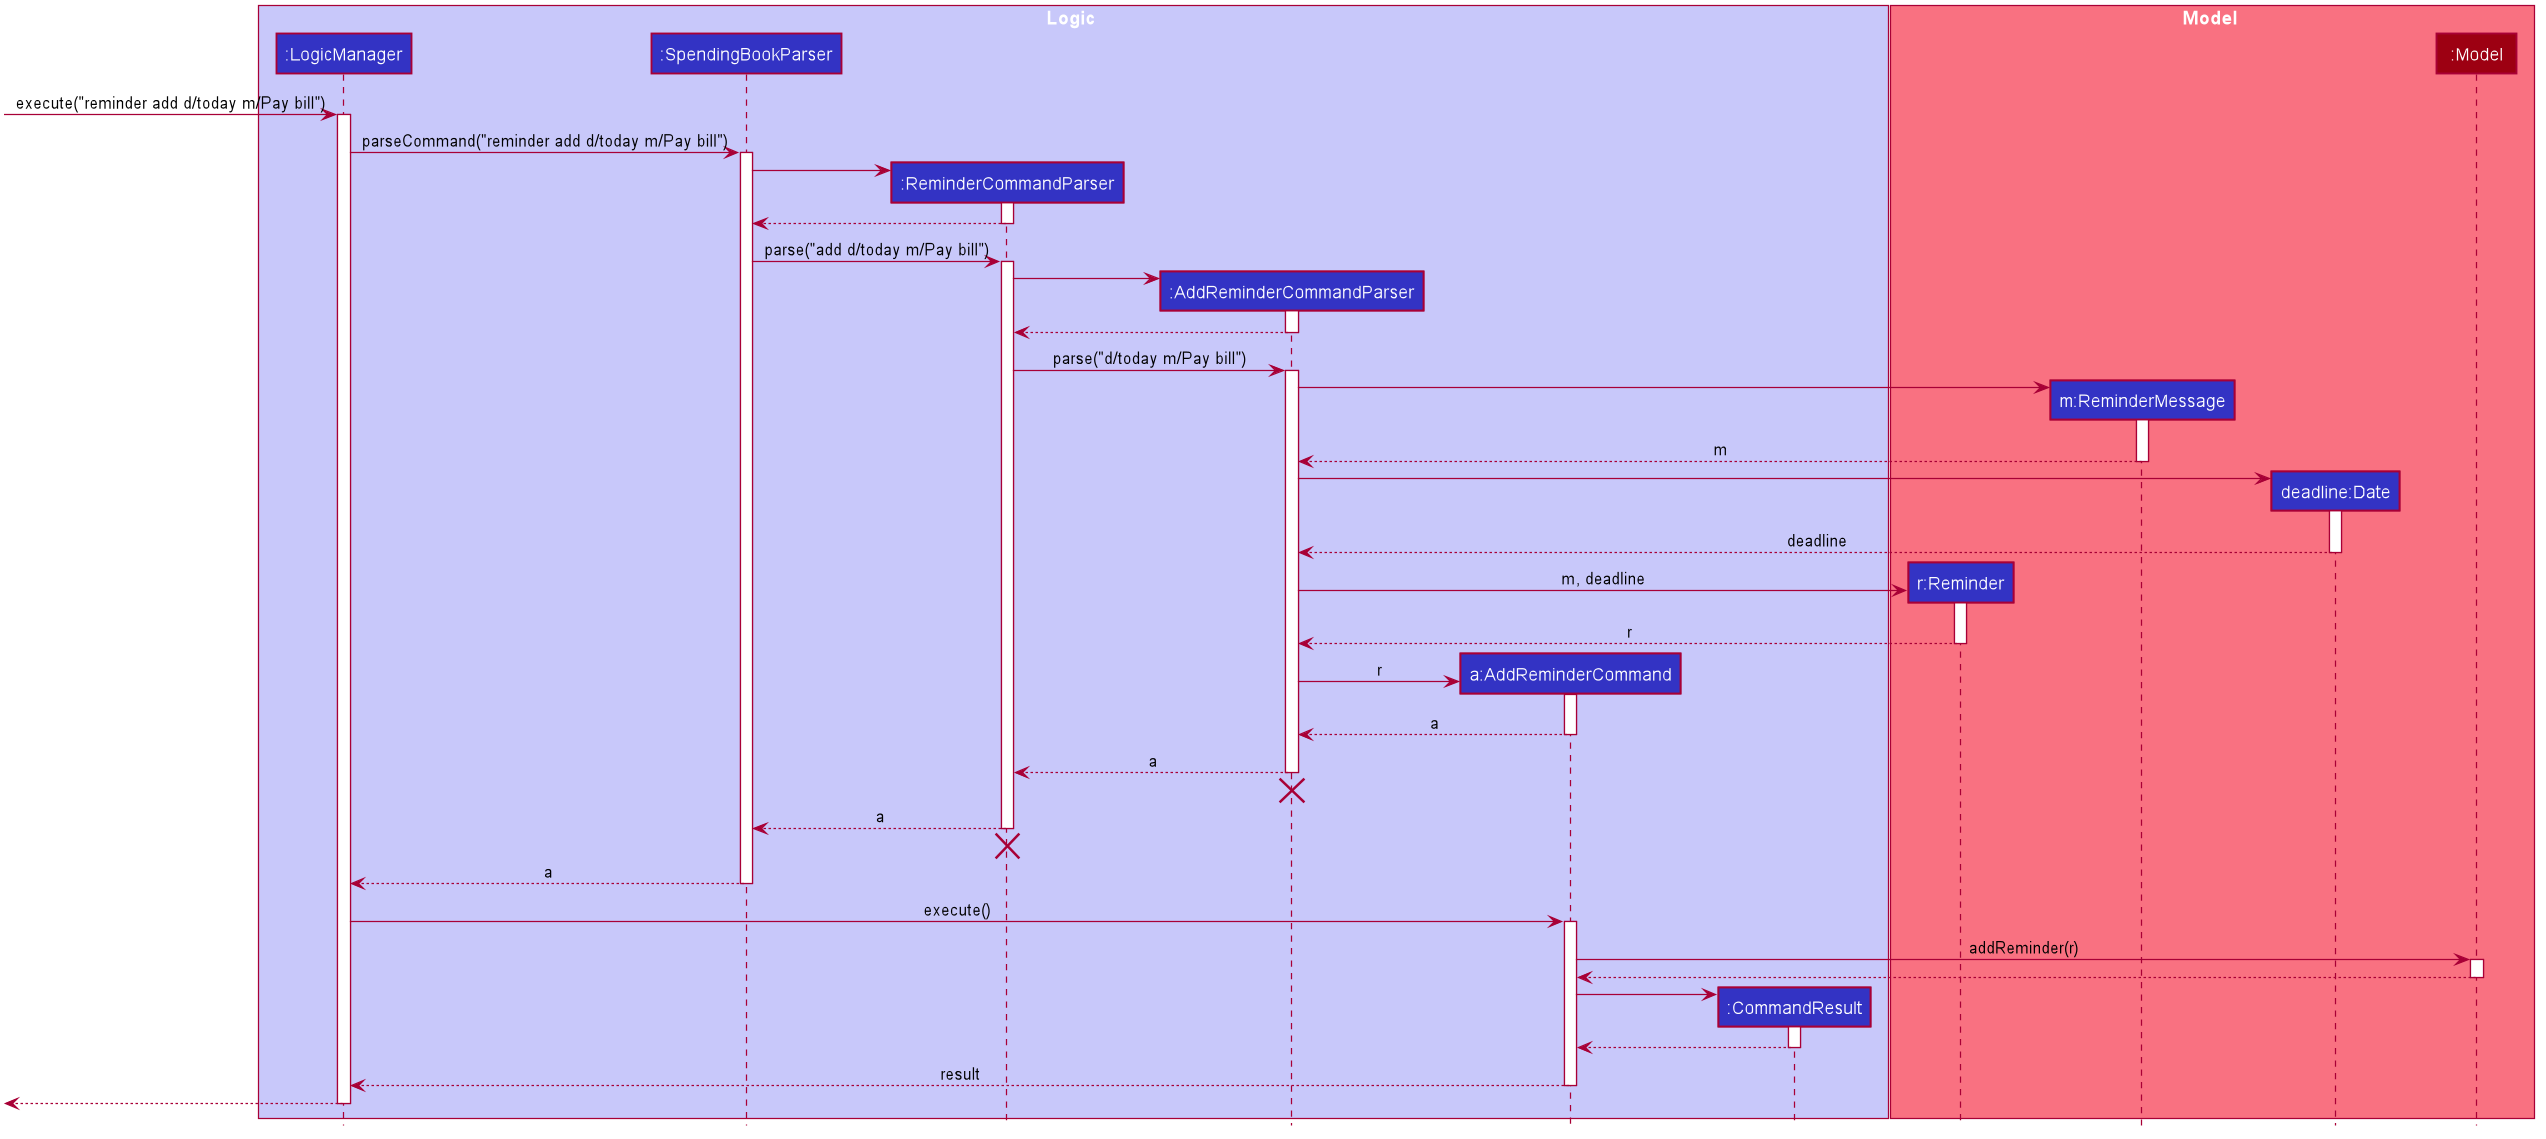
The above sequence diagram only demonstrates how an AddReminderCommand is constructed from valid user input and how it is executed. It does not show how a reminder is added into the Storage component and how the UI components are updated.
|
The following are the brief explanation of Figure 18, “Sequence diagram when a new reminder is added to the model component.”
-
The user enters
reminder add d/today m/Pay bill. -
SpendingBookParser#parseCommand()is called byLogicManager -
This creates
ReminderCommandParserand it checks if the given user input is to add a reminder, to delete a reminder or invalid. -
Next,
AddReminderCommandParseris created and it validates the parameters provided byReminderCommandParser. -
After successful validation,
AddReminderCommandis created and passed back to callers until it reaches toLogicManager. -
LogicManagerthen executes the command, adding the new reminder to the model throughModel#addReminder().
5.6.3. Implementation for Removing Reminder
In order for users to delete unwanted reminders, the following command is implemented in MoneyGoWhere application.
-
Deleting a reminder
reminder delete INDEX
e.g.reminder delete 1- delete the first reminder in the reminder list shown in UI.
Following is the activity diagram which indicates the series of actions performed by MoneyGoWhere when it receives DeleteReminderCommand.

| The negative index from user input will leads to invalid command format error as shown in the above diagram. |
Moreover, the following sequence diagram summarizes the interactions between different components when the user enter DeleteReminderCommand.
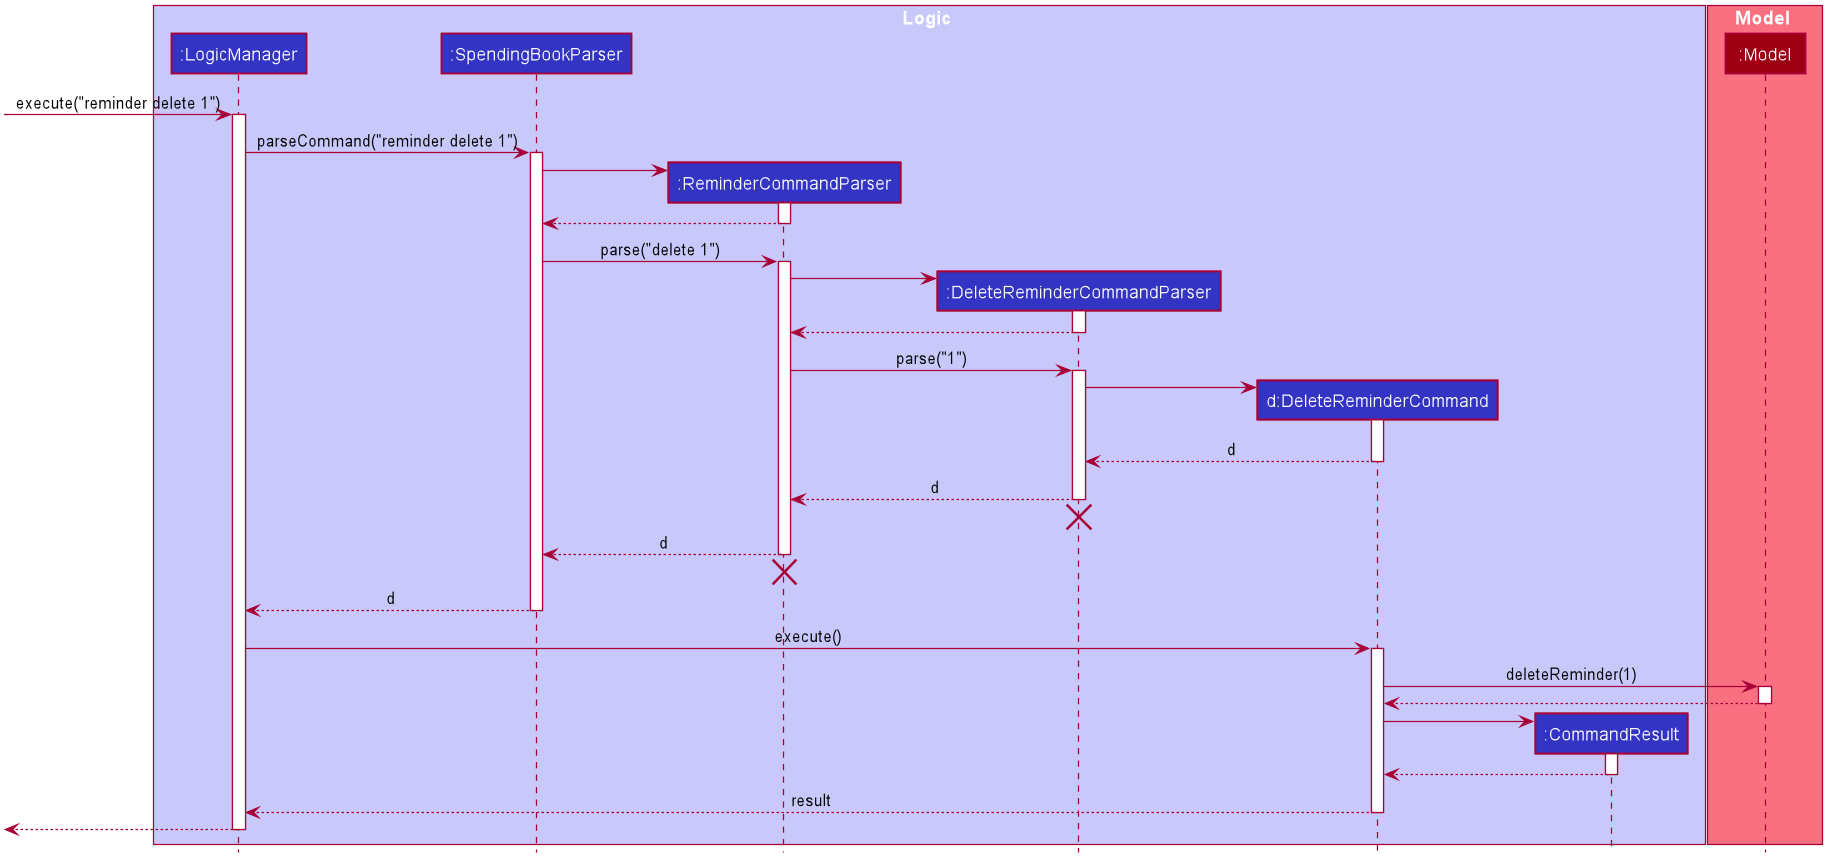
The following are the brief explanation of Figure 20, “Sequence diagram while user attempt to remove a reminder”
-
The user enters
reminder delete 1 -
SpendingBookParser#parseCommand()called byLogicManager. -
This creates
ReminderCommandParserand it checks if the given user input is to add a reminder or to delete a reminder or is invalid. -
Next,
DeleteReminderCommandParseris created and it validates the parameters provided byReminderCommandParser. -
After successful validation,
DeleteReminderCommandis created and passed back to callers until it reaches toLogic Manager. -
LogicManagerthen executes the command, removing the specified reminder from the model throughModel#deleteReminder().
The above sequence diagram only shows how a DeleteReminderCommand is created and executed. It does not include how a reminder is removed from the storage component and how the UI component is updated.
|
5.6.4. Limitations
-
The date value of the
deadlineattribute is limited to before the end of next year and must be in the future. This prevents users from entering reminder of overdue tasks as inputs. -
In this feature, the
reminderMessageattribute cannot be constructed with empty spaces. The purpose of this limitation is to prevent users from entering a reminder without specifying a message to be displayed.
5.6.5. Design Considerations
| Aspect | Alternative 1 (Current choice) | Alternative 2 |
|---|---|---|
How reminders are stored |
Store reminders together with other information in |
Store reminders in a new json file separated from other information. |
Alternative 1 from the above table, is currently implemented in MoneyGoWhere since it is efficient for the application to access user’s data from a single storage file.
The following Architecture Diagram summarizes how different components in MoneyGoWhere application interact with each other while storing a reminder from the valid user input with the current implementation.
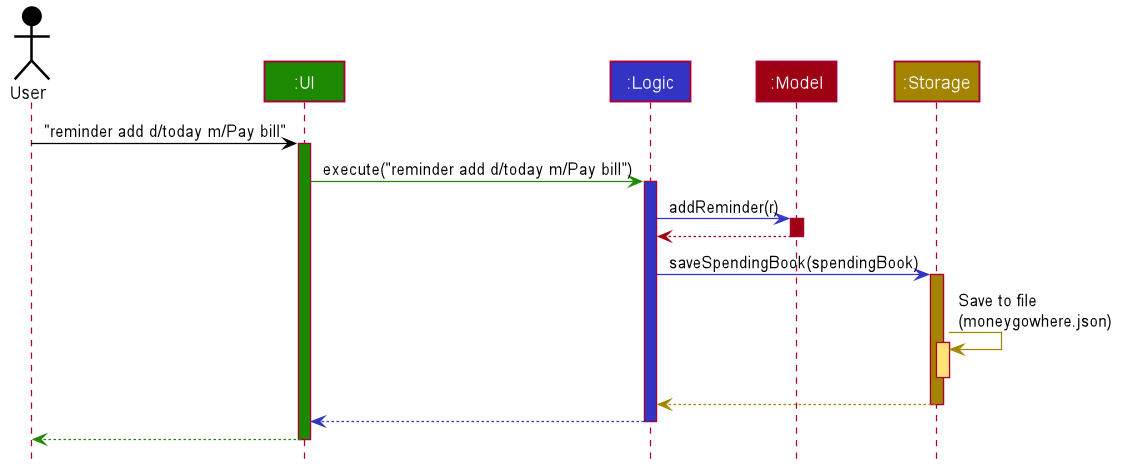
The above high-level Architecture Diagram only provides the summarized steps taken by different components while storing a reminder into MoneyGoWhere.json.
|
5.7. Import feature
|
The current implementation only imports spending data. Coming in version 2.0, |
5.7.1. Implementation
The import feature allows our users to import data from a comma-separated values (Csv) files. It allows users to add their spending in bulk.
Given below is the Sequence Diagram for interactions within the Logic component for the
execute("import p/validSpending.csv")
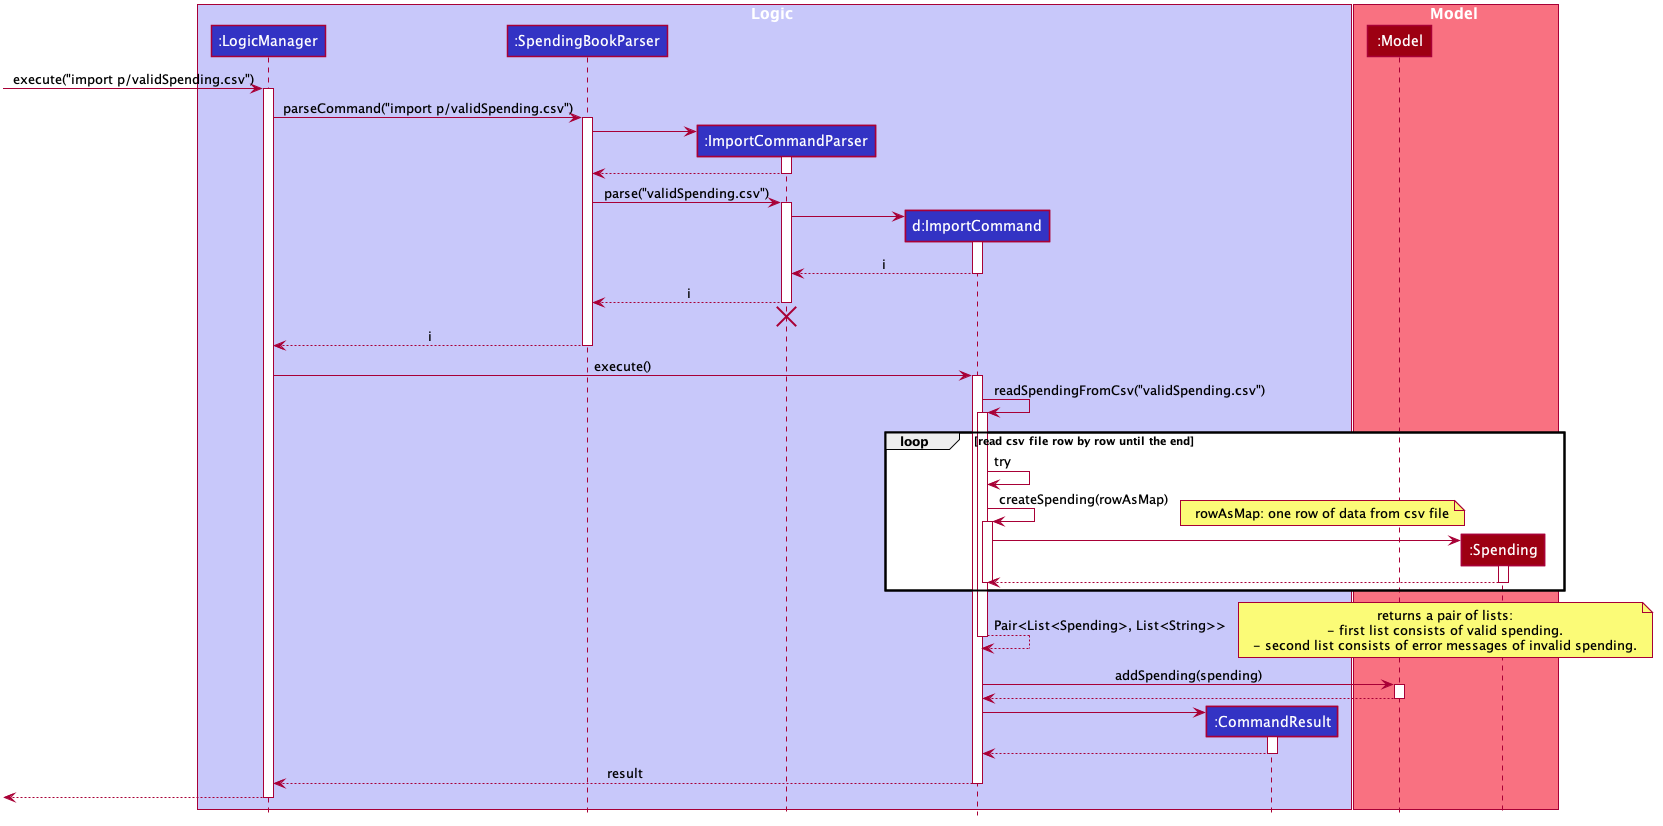
import CommandThe Import Feature has one main component, which is the ImportCommand.java file. This file contains the main logic behind the feature.
The ImportCommand#readSpendingFromCsv() method utilises the FasterXML/jackson library to read in Csv files and convert it into maps of objects.
The maps will then be processed and parsed into Spending objects which will be added into a Spending list.
Those maps that do not pass the parse conditions will then be thrown as an exception and its message will be saved inside an error list.
After all the maps are processed, the application will then go through the valid spending list and save them by calling the Model#addSpending() method.
Following that, the application will then prints an output, showing the result of the command execution.
The following activity diagram summarizes what happens when a user executes an import command:
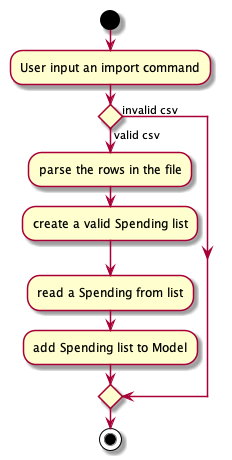
When a user calls the import command and inputs a valid Csv file, the application will read and parses all the data inside the file and save them to the SpendingBookList and moneygowhere.json.
5.7.2. Csv File Format and Constraints
In order for data to be imported into MoneyGoWhere, it must be in a properly formatted Csv file.
There should be 5 columns specified for Name, Cost, Date, Tag and Remark
Header Constraints
-
The first row is read in as the header and is required.
Cell Formatting
-
There should not be any leading and trailing spaces in a cell.
-
To specify a comma within a cell, the value of the cell should be inside double quotes. Eg:
-
"yummy, juicy"
-
"fresh, clean"
-
-
To specify double quotes within a cell, in addition to start and end double quotes, escape the double quote with another double quote. Eg:
-
"""yummy"", ""juicy"""
-
"""fresh"", ""clean"""
-
5.7.3. Design Considerations
| Aspect | Alternative 1 (current choice) | Alternative 2 |
|---|---|---|
How import executes |
Imports the entire Csv file, converts all the rows into a list of Pros: |
Imports the Csv file, converts all the rows into a list of Pros: |
Alternative 1 was chosen as it gives a much better performance as opposed to alternative 2. At first alternative 2 was chosen as it was easier to implement. However, performance issues was detected when importing more than 50 spending and when importing more than 1000 spending, the whole application stops responding.
Hence, alternative 1 was implemented and now the application could handle large amount of spending without a noticeable sluggishness in performance.
5.8. Export feature
|
The current implementation only exports spending data. Coming in version 2.0, |
5.8.1. Implementation
The export feature allows our users to export their spending into a comma-separated values(Csv) files. It allows users to export their spending allowing the spending data to be portable.
Given below is the Sequence Diagram for the interactions withing the Logic component for the execute("export p/Documents")
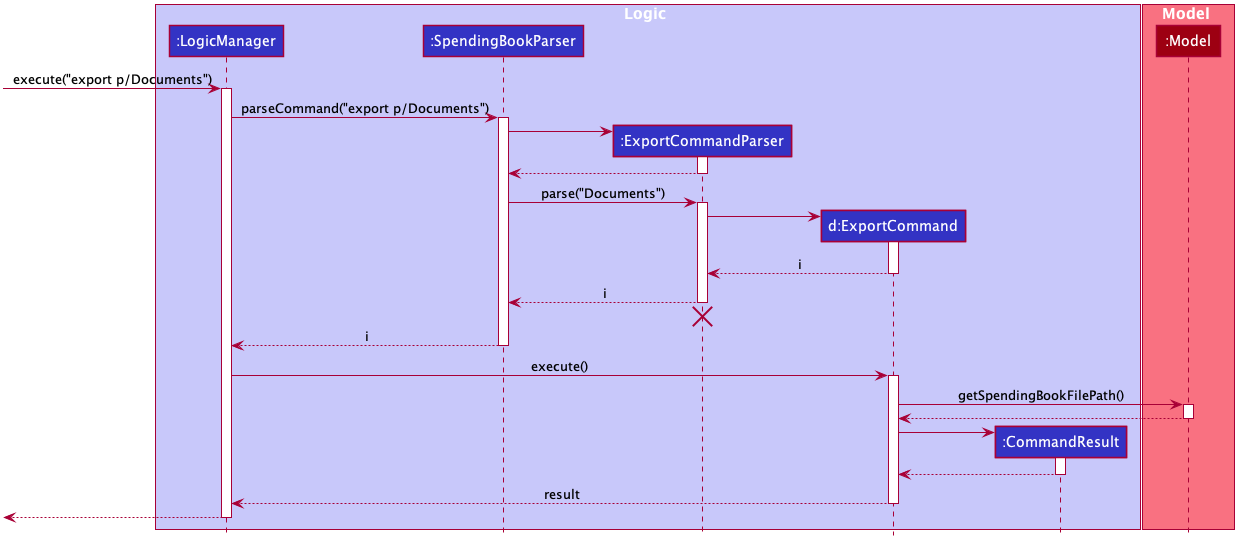
The export feature has one main component, which is the ExportCommand.java file. This file contains the main logic behind the feature.
The 'ExportCommand#execute()' method utilises the FasterXML/jackson library to read in the .json file where the application keeps the spending data.
After the data has been read successfully, it is converted and written into moneygowhere.csv file. This file will be created at wherever the user specifies.
After the data has been successfully exported, the application will then prints an output, showing the result of the command execution.
The following activity diagram summarizes what happens when a user executes an export command:
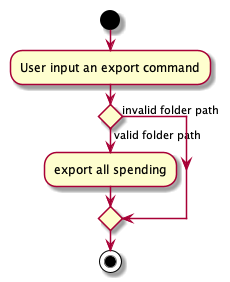
When a user calls the export command and inputs a valid folder path, the application will convert all the spending data into a Csv file and export it to moneygowhere.csv
5.9. Statistics feature
5.9.1. Current Implementation
For the current statistics feature, there are 2 main commands that the user can execute.
-
stats- display statistics for all spending -
stats d/DATE_START d/DATE_END- display statistics for spending within a date range
The StatsCommandParser differentiates these 2 commands based on whether a valid date range is provided as illustrated in the diagram below.
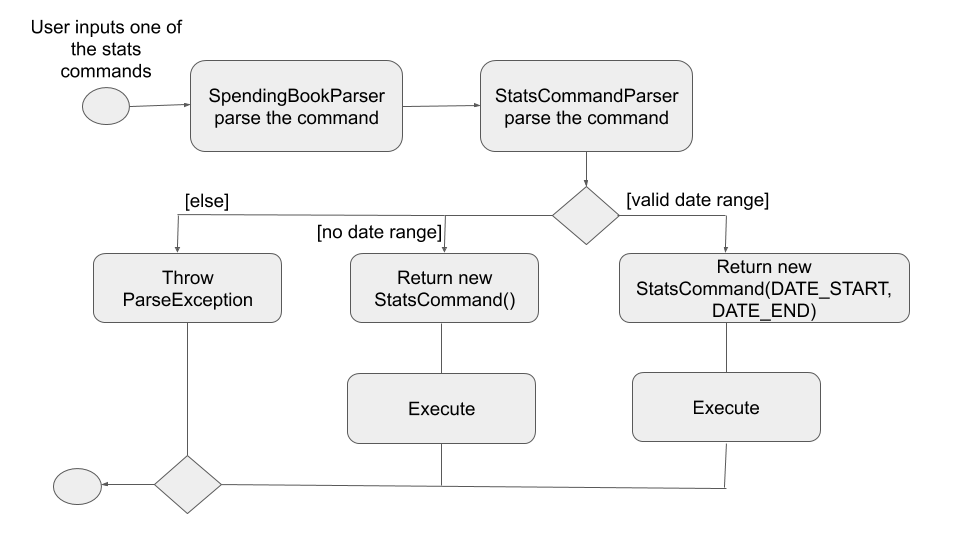
-
If a valid date range is provided in the
statscommand given by the user,StatsCommand(DATE_START, DATE_END)with the respective date parameters is created. The command will execute based on this date range. -
If no date range is provided by the user,
StatsCommand()is created, which will execute the command based on the whole date range in the list. -
Else, if the parameters are invalid, a
ParseExceptionis thrown and the application waits for a new user input.
The implementation of the Statistics feature can be split into 2 phases, preparation and execution. Given below is an explanation of how the Statistics mechanism behaves at each phase.
Preparation
During the preparation phase, the program parses the command for Statistics and verifies the arguments.
The following sequence diagram shows how stats command works during the preparation phase.
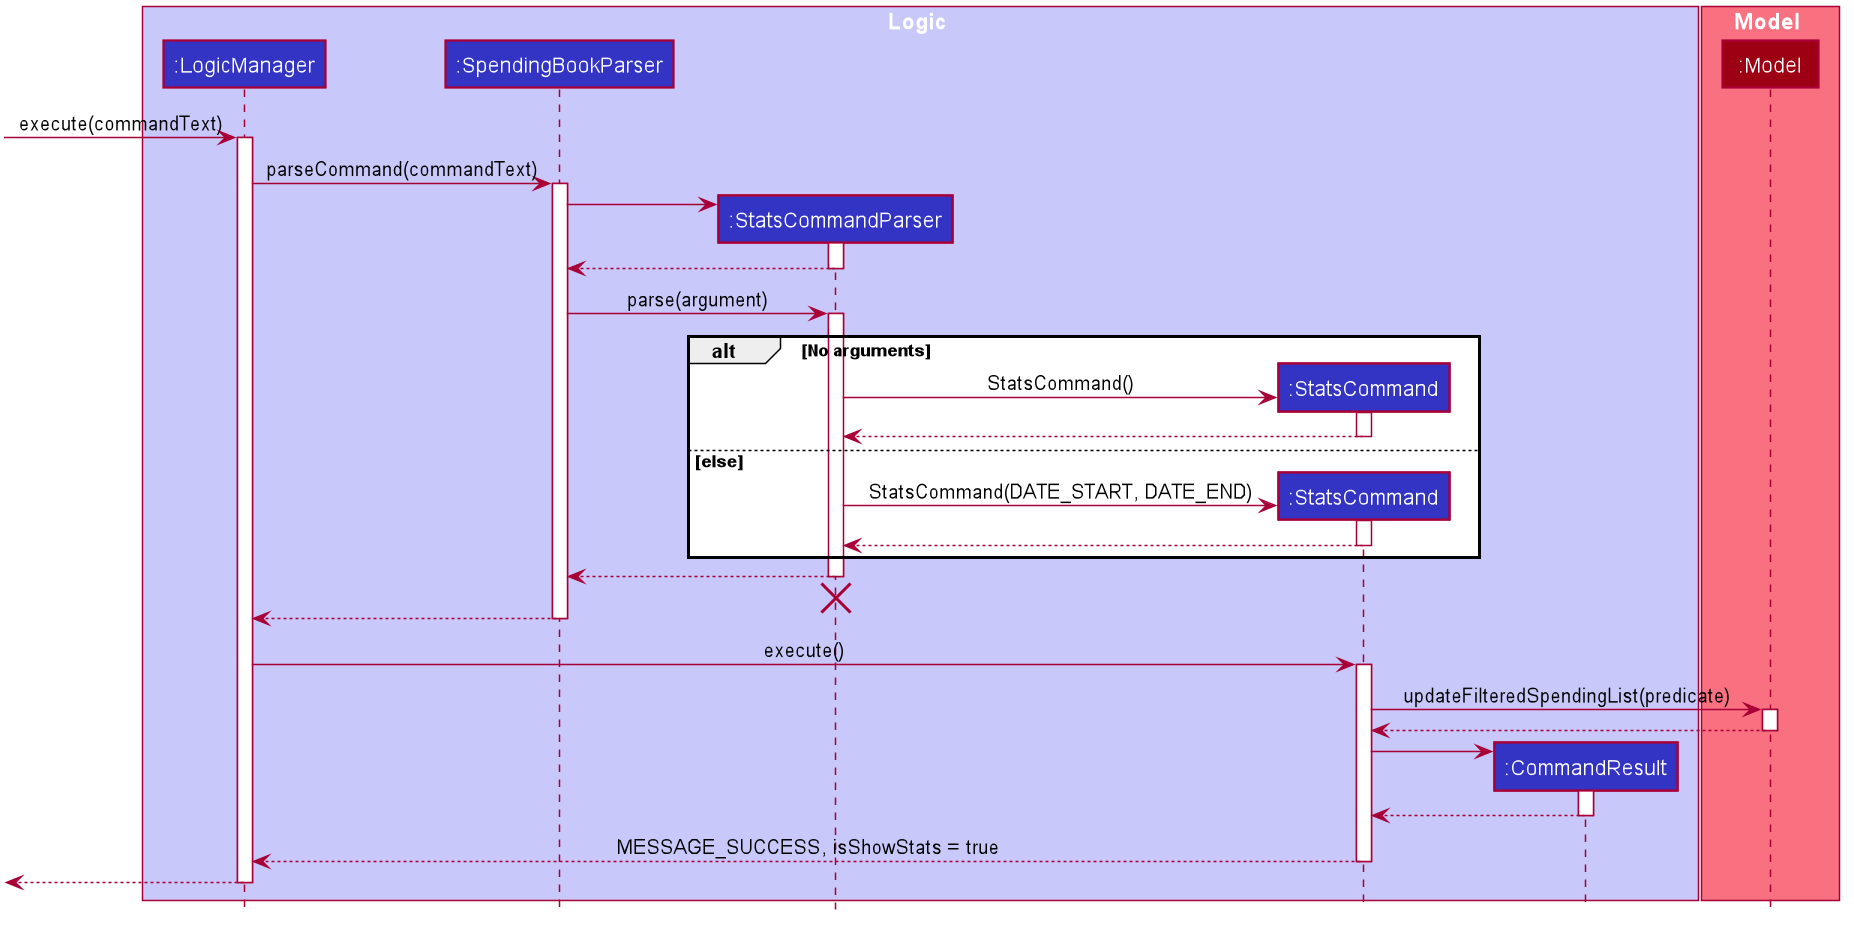
The lifeline for StatsCommandParser should end at the destroy marker (X) but due to a limitation of PlantUML, the lifeline reaches the end of diagram.
|
-
User first enters a
statscommand. -
SpendingBookParserwill parse and identify the command as aStatsCommandand pass on the argument toStatsCommandParser. -
If no arguments were provided by the user,
StatsCommand#StatsCommand()is called to create aStatsCommandwith no parameters. Otherwise,StatsCommandParserwill verify whether the arguments provided were valid.-
If they are valid,
StatsCommand#StatsCommand(DATE_START, DATE_END)is called to create aStatsCommandwith the specified parameters. -
Else, a
ParseExceptionwill be thrown and an error message will be shown to the user.
-
-
StatsCommandis returned toLogicManagerwhich then callsStatsCommand#execute(). -
Model#updateFilteredSpendingList(predicate)is subsequently called to update the list.
Execution
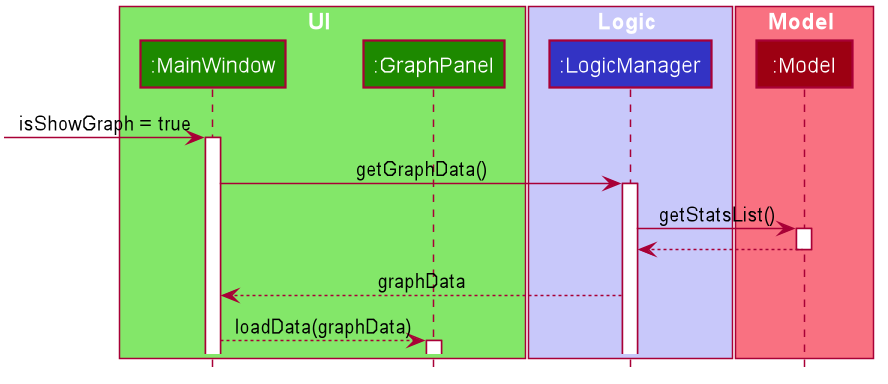
In the execution phase, the program processes and retrieves the data to be displayed and finally displaying it. Below is the UML sequence diagram and a step-by-step explanation.

-
Upon checking that the boolean
isShowStats= true, theMainWindowcallsLogicManager#getStatsData(). -
LogicManagerthen gets the filtered list by callingModel#getStatsList, which returns an unmodifiableObservableList, containing only spending within the specified date range. -
LogicManager#getStatsData()then processes the spending and organise the data into aLinkedHashMap<String, Double>where the key value pairs represents tag and cost respectively. -
Finally, the
statsDatais returned to theMainWindow. The data will be displayed on the Ui throughStatsPanel#loadData(statsData)call.
5.9.2. Design Considerations
| Aspect | Alternative 1 (Current choice) | Alternative 2 |
|---|---|---|
Visual Representation of Statistics |
Represent data in the form of a pie chart. |
Represent data in the form of a table. |
5.10. Graph feature
5.10.1. Current Implementation
For the current graph feature, there are 2 main commands that the user can execute.
-
graph- generates graph for all spending -
graph d/DATE_START d/DATE_END- generates graph for spending within a date range
The GraphCommandParser differentiates these 2 commands based on whether a valid date range is provided as illustrated in the diagram below.

-
If a valid date range is provided in the
graphcommand given by the user,GraphCommand(DATE_START, DATE_END)with the respective date parameters is created. The command will execute based on this date range. -
If no date range is provided by the user,
GraphCommand()is created, which will execute the command based on the whole date range in the list. -
Else, if the parameters are invalid, a
ParseExceptionis thrown and the application waits for a new user input.
The implementation of the Graph feature can be split into 2 phases, preparation and execution. Given below is an explanation of how the Graph mechanism behaves at each phase.
Preparation
During the preparation phase, the program parses the command for Graph and verifies the arguments.
The following sequence diagram shows how graph command works during the preparation phase.

The lifeline for GraphCommandParser should end at the destroy marker (X) but due to a limitation of PlantUML, the lifeline reaches the end of diagram.
|
-
User first enters a
graphcommand. -
SpendingBookParserwill parse and identify the command as aGraphCommandand pass on the argument toGraphCommandParser. -
If no arguments were provided by the user,
GraphCommand#GraphCommand()is called to create a GraphCommand with no parameters. Otherwise,GraphCommandParserwill verify whether the arguments provided were valid.-
If they are valid,
GraphCommand#GraphCommand(DATE_START, DATE_END)is called to create aGraphCommandwith the specified parameters. -
Else, a
ParseExceptionwill be thrown and an error message will be shown to the user.
-
-
GraphCommandis returned toLogicManagerwhich then callsGraphCommand#execute(). -
Model#updateFilteredSpendingList(predicate)is subsequently called to update the list.
Execution
In the execution phase, the program processes and retrieves the data to be displayed and finally displaying it. Below is the UML sequence diagram and a step-by-step explanation.
-
Upon checking that the boolean
isShowGraph= true, theMainWindowcallsLogicManager#getGraphData(). -
LogicManagerthen gets the filtered list by callingModel#getStatsList, which returns an unmodifiableObservableList, containing only spending within the specified date range. -
LogicManager#getGraphData()then processes the spending and organise the data into aLinkedHashMap<String, Double>where the key value pairs represents date and cost respectively. -
Finally, the
graphDatais returned to theMainWindow. The data will be displayed on the Ui throughGraphPanel#loadData(graphData)call.
5.10.2. Design Considerations
| Aspect | Alternative 1 (Current choice) | Alternative 2 |
|---|---|---|
Whether to merge Graph and Statistics features into one command |
Distinct commands for Graph and Statistics features. |
Merge Graph and Statistics features into one command. |
5.11. Budget feature
The Budget component has two core features:
-
Allowing the user to set the monthly budget
-
Calculating the remanding budget after all the spending in the same month.
The budget component allows the users to modify the current monthly budget budget AMOUNT command, where AMOUNT is a
double representing the desired monthly budget. The amount cannot exceed 1,000,000,000 Singapore dollars.
For example budget 10000 sets the current monthly budget to 10000.
| The budget amount must be a positive number no greater than 1000000000 Singapore dollars and must only have two digits after the decimal point. |
The second functionality is done automatically by the program, which finds the total spending in the month and reduces the sum from the budget.
5.11.1. Current Implementation
The current Budget component keeps track of three variables:
-
The monthly budget amount.
-
The month the budget is set.
-
The sum of all spending in the month.
The budget amount and the month the budget is set are saved in the save file, whereas the sum is not. Upon initialization, if a save file is found it will automatically set the monthly budget based on the save file’s options. Once the save file is loaded, the program will check today’s month. If the month has changed, the budget’s set month will change to the current month, and the budget amount will carry over. Once the month has been set, it will go through all spending available and sum up all the spending that are in the set month. It will then keep track of this sum.
Once done initializing, users can set a new monthly budget by executing the budget command.
The sequence diagram below demonstrates how the budget command is executed:
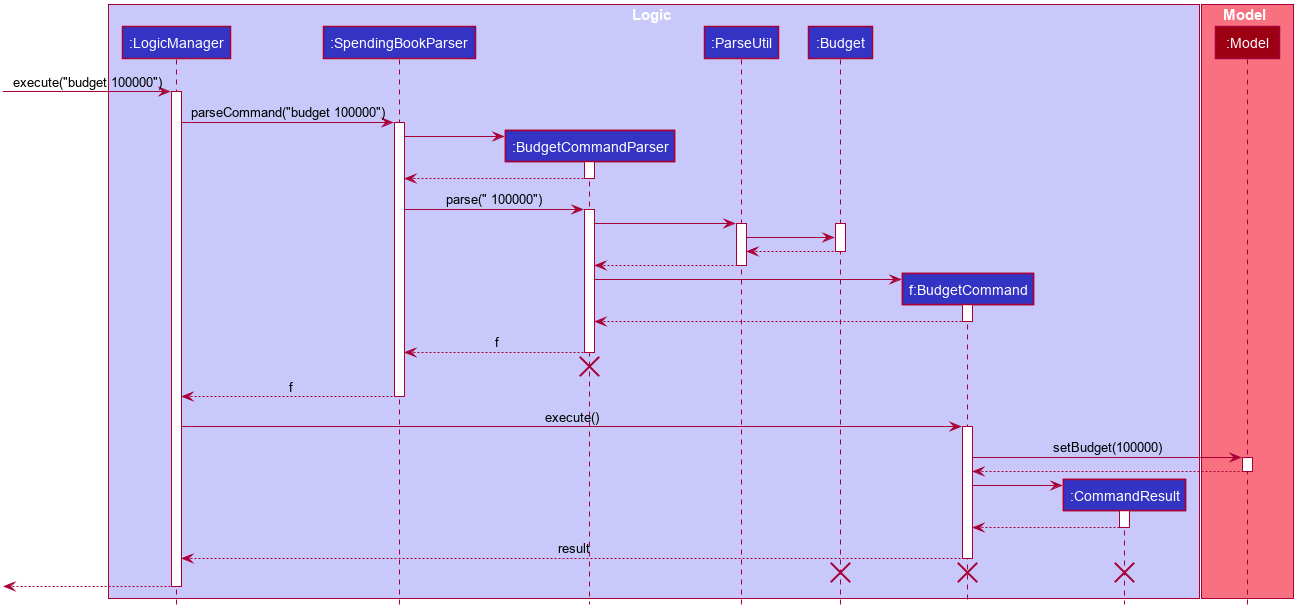
The figure above shows the sequence of events that occur to set the monthly budget:
-
User first enters "budget 100000".
-
The
LogicManagerreceives the user input and passes it to theSpendingBookParser, which passes it toBudgeCommandParserto parse the user input. -
If the user input is valid, a
BudgetCommandis then created. -
The
BudgetCommandis then executed. -
The Budget in Model then set to the new amount.
Budget also keeps track of the sum of all spending in order to show the user how much budget the user has left.
Initially, it has totaled up all spending in the save file, and then the value is modified when the add, delete and edit commands are called.
The following sequence diagram demonstrates how Budget modifies its value when the add command is used:
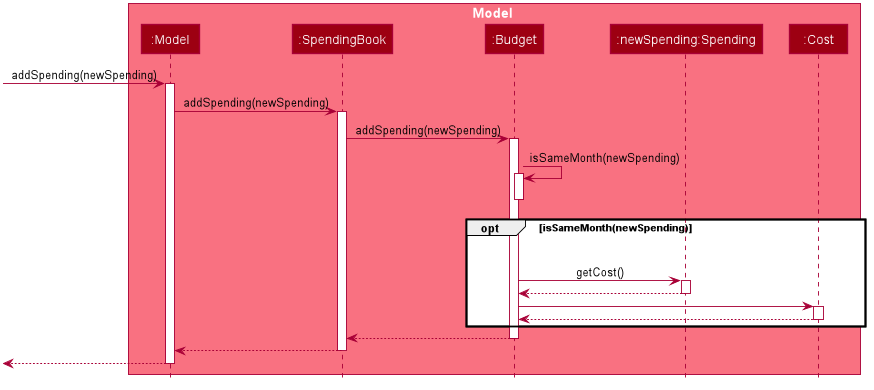
Budget when add command is calledThe diagram above shows what happens when an addCommand is being executed. It focuses only on the components that affect Budget.
When adding a new Spending the following steps happen:
-
The new
Spendingis passed to Model to be added. -
The new
Spendingis then passed toSpendingBookto be added. -
SpendingBook passes the
SpendingtoBudget. -
Budgetchecks whether theSpendingis in the same month as it is set or not. -
If they are in the same month, the sum of
Budgetis updated accordingly.
The same applies to delete commands, instead of adding to the sum, it is subtracting from the sum.
As well as edit command, which utilizes both add and delete.
5.11.2. Design Consideration
| Aspect | Alternative 1 | Alternative 2 |
|---|---|---|
Method to calculate sum of spending |
Keep track of the sum and modifies the sum when |
Calculate from |
A combination of the two was chosen. During the initialization phase, we read through
all spending available, but we handle add, delete and edit commands using option 1.
5.12. [Proposed] Undo/Redo feature
5.12.1. Proposed Implementation
The undo/redo mechanism is facilitated by VersionedSpendingBook.
It extends SpendingBook with an undo/redo history, stored internally as an spendingBookStateList and currentStatePointer.
Additionally, it implements the following operations:
-
VersionedSpendingBook#commit()— Saves the current spending book state in its history. -
VersionedSpendingBook#undo()— Restores the previous spending book state from its history. -
VersionedSpendingBook#redo()— Restores a previously undone spending book state from its history.
These operations are exposed in the Model interface as Model#commitSpendingBook(), Model#undoSpendingBook() and Model#redoSpendingBook() respectively.
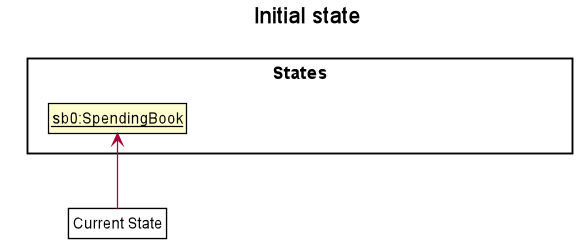
Given below is an example usage scenario and how the undo/redo mechanism behaves at each step.
Step 1. The user launches the application for the first time. The VersionedSpendingBook will be initialized with the initial spending book state, and the currentStatePointer pointing to that single spending book state.
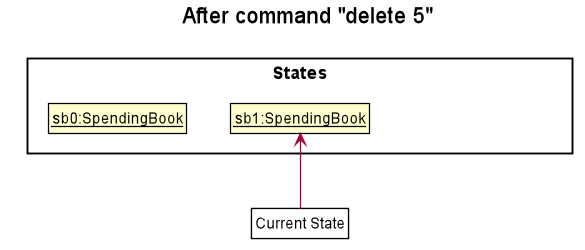
Step 2. The user executes delete 5 command to delete the 5th Spending in the spending book. The delete command calls Model#commitSpendingBook(), causing the modified state of the spending book after the delete 5 command executes to be saved in the spendingBookStateList, and the currentStatePointer is shifted to the newly inserted spending book state.
Step 3. The user executes add n/David … to add a new Spending. The add command also calls Model#commitSpendingBook(), causing another modified spending book state to be saved into the spendingBookStateList.
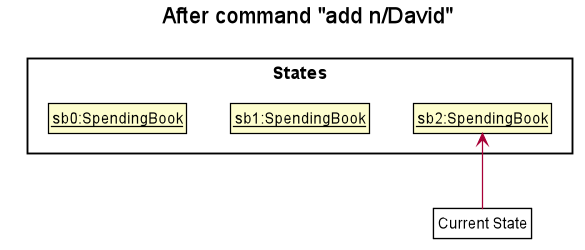
If a command fails its execution, it will not call Model#commitSpendingBook(), so the spending book state will not be saved into the spendingBookStateList.
|
Step 4. The user now decides that adding the Spending was a mistake, and decides to undo that action by executing the undo command. The undo command will call Model#spendingBook(), which will shift the currentStatePointer once to the left, pointing it to the previous spending book state, and restores the spending book to that state.

If the currentStatePointer is at index 0, pointing to the initial spending book state, then there are no previous spending book states to restore. The undo command uses Model#canUndoSpendingBook() to check if this is the case. If so, it will return an error to the user rather than attempting to perform the undo.
|
The following sequence diagram shows how the undo operation works:
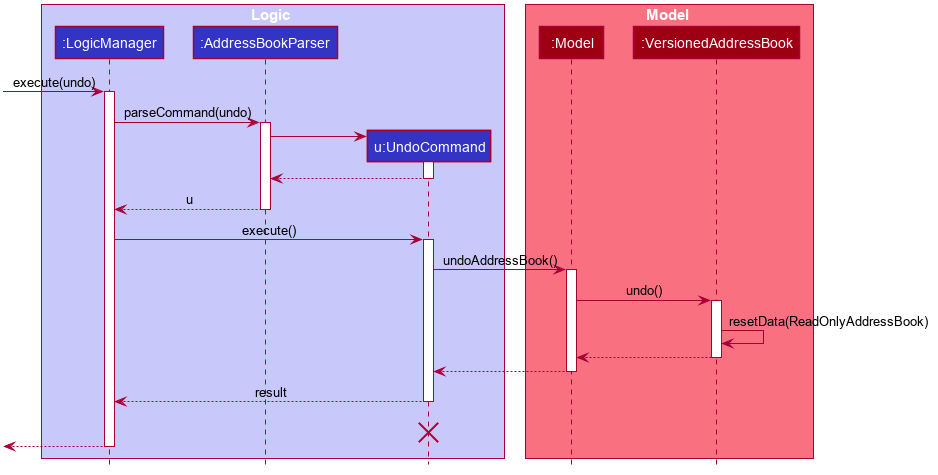
The lifeline for UndoCommand should end at the destroy marker (X) but due to a limitation of PlantUML, the lifeline reaches the end of diagram.
|
The redo command does the opposite — it calls Model#redoSpendingBook(), which shifts the currentStatePointer once to the right, pointing to the previously undone state, and restores the spending book to that state.
If the currentStatePointer is at index spendingBookStateList.size() - 1, pointing to the latest spending book state, then there are no undone spending book states to restore. The redo command uses Model#canRedoSpendingBook() to check if this is the case. If so, it will return an error to the user rather than attempting to perform the redo.
|
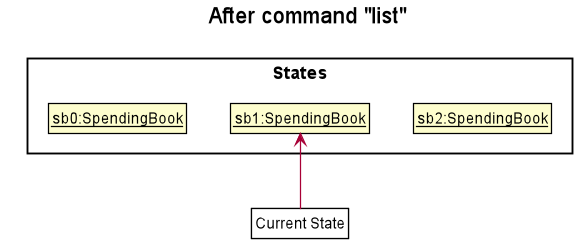
Step 5. The user then decides to execute the command list. Commands that do not modify the spending book, such as list, will usually not call Model#commitSpendingBook(), Model#undoSpendingBook() or Model#redoSpendingBook(). Thus, the SpendingBookStateList remains unchanged.
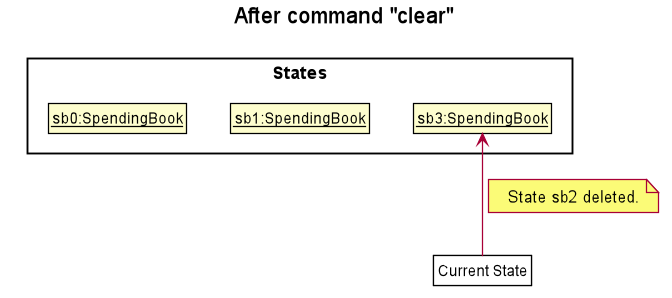
Step 6. The user executes clear, which calls Model#commitSpendingBook(). Since the currentStatePointer is not pointing at the end of the SpendingBookStateList, all spending book states after the currentStatePointer will be purged. We designed it this way because it no longer makes sense to redo the add n/David … command. This is the behavior that most modern desktop applications follow.
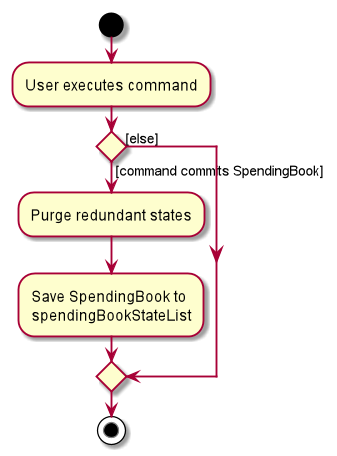
The following activity diagram summarizes what happens when a user executes a new command:
5.12.2. Design Considerations
Aspect: How undo & redo executes
| Aspect | Alternative 1 (current choice) | Alternative 2 |
|---|---|---|
How undo & redo executes |
Saves the entire spending book. |
Individual command knows how to undo/redo by itself. |
Data structure to support the undo/redo commands |
Use a list to store the history of spending book states. |
Use |
6. Documentation
We use asciidoc for writing documentation.
| We chose asciidoc over Markdown because asciidoc, although a bit more complex than Markdown, provides more flexibility in formatting. |
6.1. Editing Documentation
See UsingGradle.adoc to learn how to render .adoc files locally to preview the end result of your edits.
Alternatively, you can download the AsciiDoc plugin for IntelliJ, which allows you to preview the changes you have made to your .adoc files in real-time.
6.2. Editing Diagrams
See UsingPlantUml.adoc to find out how to create and update the UML diagrams in the developer guide.
6.3. Publishing Documentation
See UsingTravis.adoc to learn how to deploy GitHub Pages using Travis.
6.4. Converting Documentation to PDF format
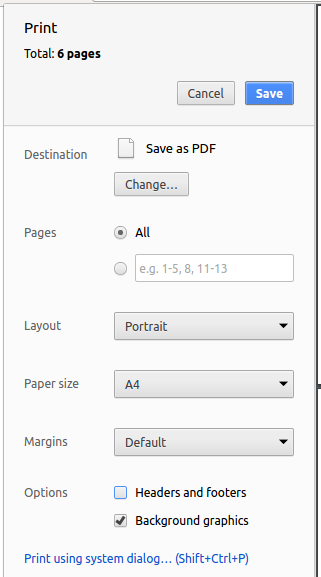
We use Google Chrome for converting documentation to PDF format, as Chrome’s PDF engine preserves hyperlinks used in webpages.
Here are the steps to convert the project documentation files to PDF format.
-
Follow the instructions in UsingGradle.adoc to convert the AsciiDoc files in the
docs/directory to HTML format. -
Go to your generated HTML files in the
build/docsfolder, right click on them and selectOpen with→Google Chrome. -
Within Chrome, click on the
Printoption in Chrome’s menu. -
Set the destination to
Save as PDF, then clickSaveto save a copy of the file in PDF format. For best results, use the settings indicated in the screenshot below.
6.5. Site-wide Documentation Settings
The build.gradle file specifies some project-specific asciidoc attributes which affects how all documentation files within this project are rendered.
Attributes left unset in the build.gradle file will use their default value, if any.
|
| Attribute name | Description | Default value |
|---|---|---|
|
The name of the website. If set, the name will be displayed near the top of the page. |
not set |
|
URL to the site’s repository on GitHub. Setting this will add a "View on GitHub" link in the navigation bar. |
not set |
|
Define this attribute if the project is an official SE-EDU project. This will render the SE-EDU navigation bar at the top of the page, and add some SE-EDU-specific navigation items. |
not set |
6.6. Per-file Documentation Settings
Each .adoc file may also specify some file-specific asciidoc attributes which affects how the file is rendered.
Asciidoctor’s built-in attributes may be specified and used as well.
Attributes left unset in .adoc files will use their default value, if any.
|
| Attribute name | Description | Default value |
|---|---|---|
|
Site section that the document belongs to.
This will cause the associated item in the navigation bar to be highlighted.
One of: * Official SE-EDU projects only |
not set |
|
Set this attribute to remove the site navigation bar. |
not set |
6.7. Site Template
The files in docs/stylesheets are the CSS stylesheets of the site.
You can modify them to change some properties of the site’s design.
The files in docs/templates controls the rendering of .adoc files into HTML5.
These template files are written in a mixture of Ruby and Slim.
|
Modifying the template files in |
7. Testing
7.1. Running Tests
There are two ways to run tests.
Method 1: Using IntelliJ JUnit test runner
-
To run all tests, right-click on the
src/test/javafolder and chooseRun 'All Tests' -
To run a subset of tests, you can right-click on a test package, test class, or a test and choose
Run 'ABC'
Method 2: Using Gradle
-
Open a console and run the command
gradlew clean test(Mac/Linux:./gradlew clean test)
| See UsingGradle.adoc for more info on how to run tests using Gradle. |
7.2. Types of tests
We have three types of tests:
-
Unit tests targeting the lowest level methods/classes.
e.g.seedu.moneygowhere.commons.StringUtilTest -
Integration tests that are checking the integration of multiple code units (those code units are assumed to be working).
e.g.seedu.moneygowhere.storage.StorageManagerTest -
Hybrids of unit and integration tests. These test are checking multiple code units as well as how the are connected together.
e.g.seedu.moneygowhere.logic.LogicManagerTest
7.3. Troubleshooting Testing
Problem: Keyboard and mouse movements are not simulated on macOS Mojave, resulting in GUI Tests failure.
-
Reason: From macOS Mojave onwards, applications without
Accessibilitypermission cannot simulate certain keyboard and mouse movements. -
Solution: Open
System Preferences, clickSecurity and Privacy→Privacy→Accessibility, and check the box besideIntellij IDEA.
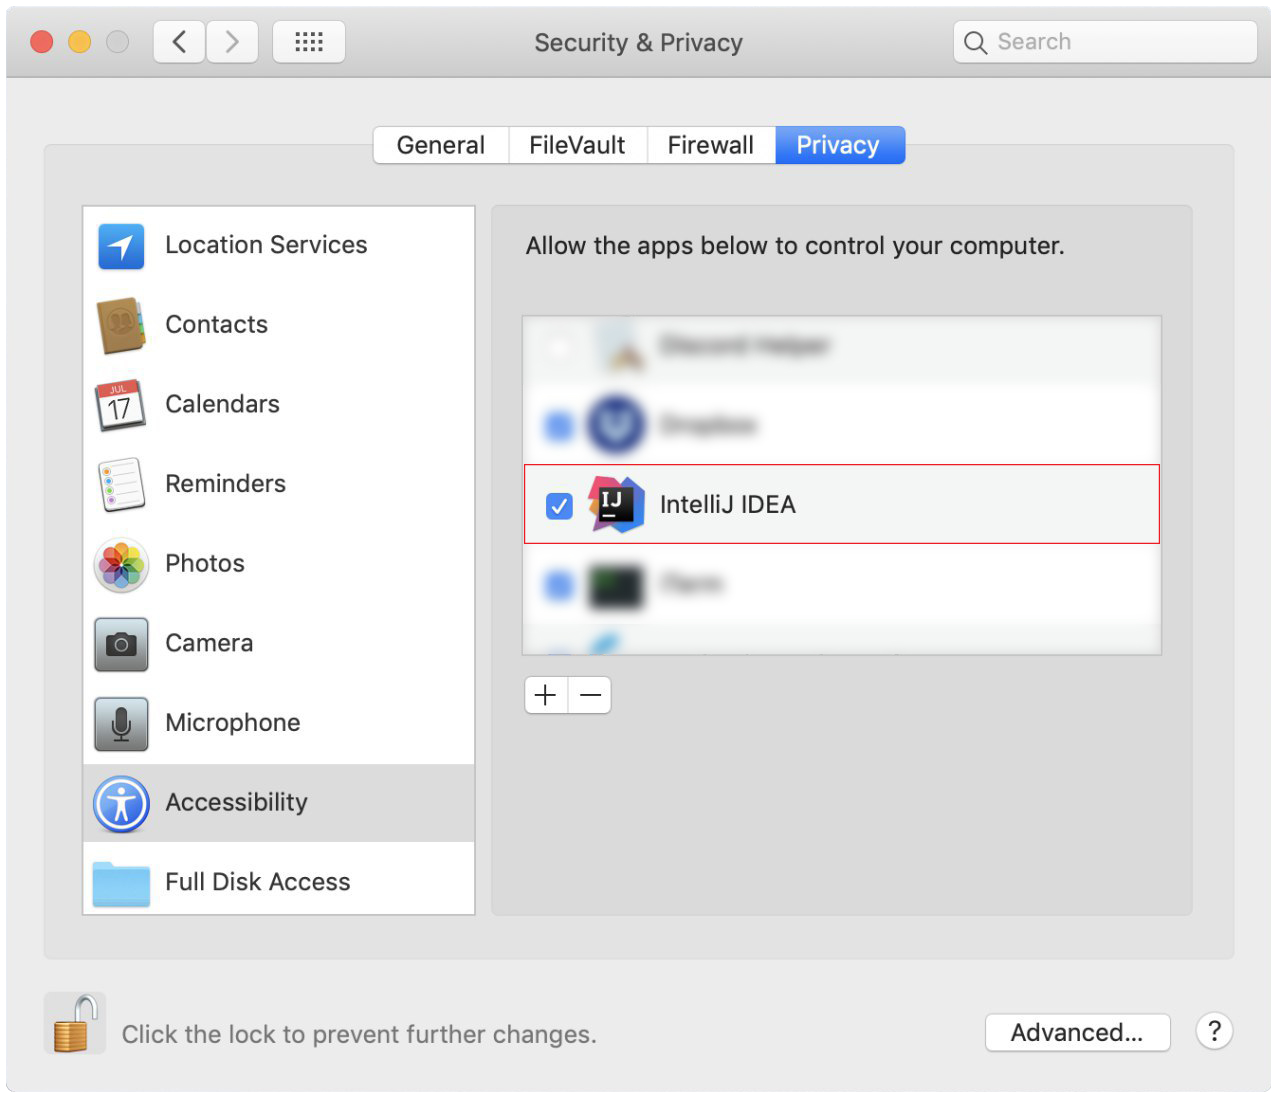
Accessibility permission is granted to IntelliJ IDEA8. Dev Ops
8.1. Build Automation
See UsingGradle.adoc to learn how to use Gradle for build automation.
8.2. Continuous Integration
We use Travis CI and AppVeyor to perform Continuous Integration on our projects. See UsingTravis.adoc and UsingAppVeyor.adoc for more details.
8.3. Coverage Reporting
We use Coveralls to track the code coverage of our projects. See UsingCoveralls.adoc for more details.
8.4. Documentation Previews
When a pull request has changes to asciidoc files, you can use Netlify to see a preview of how the HTML version of those asciidoc files will look like when the pull request is merged. See UsingNetlify.adoc for more details.
8.5. Making a Release
Here are the steps to create a new release.
-
Update the version number in
MainApp.java. -
Generate a JAR file using Gradle.
-
Tag the repo with the version number. e.g.
v0.1 -
Create a new release using GitHub and upload the JAR file you created.
8.6. Managing Dependencies
A project often depends on third-party libraries. For example, MoneyGoWhere depends on the Jackson library for JSON parsing. Managing these dependencies can be automated using Gradle. For example, Gradle can download the dependencies automatically, which is better than these alternatives:
-
Include those libraries in the repo (this bloats the repo size)
-
Require developers to download those libraries manually (this creates extra work for developers)
Appendix A: Product Scope
Target user profile:
-
students who have yet to earn a stable income
-
has a need to store and track personal finances
-
wants to set a budget
-
prefer desktop apps over other types
-
can type fast
-
prefers typing over mouse input
-
is reasonably comfortable using CLI apps
-
wishes to import or export their data to a Csv file
Value proposition: manage budget quickly compared to a typical mouse/GUI driven app which saves time and makes it more convenient.
Appendix B: User Stories
Priorities: High (must have) - * * *, Medium (nice to have) - * *, Low (unlikely to have) - *
| Priority | As a … | I want to … | So that I can… |
|---|---|---|---|
|
user |
add a spending |
keep track of how much I spent on a particular item |
|
user |
update my spending |
correct any mistakes |
|
user |
delete a spending |
remove spending that I keyed in wrongly |
|
user |
view my current monthly spending on different categories |
keep track of my spending |
|
budget conscious user |
set budget goals |
make sure I do not overspend |
|
user |
see the difference between my budget and spending |
be aware of my finances |
|
new user |
view more information about a particular command |
learn how to use the command |
|
user |
calculate my total spending |
keep track of my total spending |
|
user |
import data |
have different data from external source |
|
user |
export data |
view my spending in another device |
|
user |
undo my previous action |
revert my mistakes |
|
user |
redo my previous action |
move forward in history |
|
user |
view daily/monthly/yearly expenditure |
have a projected view of all my spending |
|
advanced user |
search partial keywords from the description of my spending |
view more refined search results |
|
user |
sort my spending |
view my spending in a clear order |
|
user |
use natural human language to type commands to the program |
do not have to type in a specific format |
|
user who likes to keep notes |
add a note for my spending |
add additional information to my spending |
|
user who likes to keep notes |
update my notes |
modify the notes as needed |
|
user who likes to keep notes |
delete my notes |
delete the note as needed |
|
user |
generate statistics |
have an overview of my spending |
|
user |
view my future outlook |
reflect on my current spending habits |
|
user |
view my monthly spending in a graph |
do not have to see confusing numbers |
|
user |
view my spending based on a date range |
fine-tune my spending based on a time period |
|
user |
filter my spending based on tag |
view my spending on that tag |
|
advanced user |
use a shorter version of the command |
type faster |
|
forgetful user |
set a reminder |
reminded of my payment deadlines |
Appendix C: Use Cases
(For all use cases below, the System is the MoneyGoWhere and the Actor is the user, unless specified otherwise)
UC01 Add a spending
MSS
-
User enters a spending.
-
MoneyGoWhere adds the specified spending inside the list of spending.
Use case ends.
UC02 Edit a spending
MSS
-
User requests to view the list of spending.
-
MoneyGoWhere shows a list of spending.
-
User requests to update name/cost/date of purchase/tag/remark of a spending.
-
MoneyGoWhere updates the specified fields(s) of the spending.
Use case ends.
Extensions
-
2a. The list is empty.
Use case ends.
-
3a. The given index is invalid.
-
3a1. MoneyGoWhere shows an error message.
Use case resumes at step 2.
-
UC03 Delete a spending
MSS
-
User requests to view the list of spending.
-
MoneyGoWhere shows a list of spending.
-
User requests to delete a specific spending from the list.
-
MoneyGoWhere deletes the spending.
Use case ends.
Extensions
-
2a. The list is empty.
Use case ends.
-
3a. The given index is invalid.
-
3a1. MoneyGoWhere shows an error message.
Use case resumes at step 2.
-
UC04 List all spending
MSS
-
User requests to list all spending.
-
MoneyGoWhere shows list of spending in the default order of date in descending order, cost in descending order, name in ascending order and remark in ascending order.
Use case ends.
UC05 Find a spending
MSS
-
User requests to find all occurrences of entered keywords, optionally within the spending name, a cost range, date range, remark and tag in a spending.
-
MoneyGoWhere shows spending found with the keywords contained within its cost range, date range, remark and tag specified.
Use case ends.
UC06 Sort displayed spending
MSS
-
User requests to sort based on optionally provided fields such as spending name, cost range, date range or remark, in ascending or descending order.
-
MoneyGoWhere displays current spending entries with the given order.
Use case ends.
UC07 Set a monthly budget
MSS
-
User requests to set a monthly budget
-
MoneyGoWhere sets a specific monthly budget
Use case ends.
Extensions
-
1a. The given budget value is invalid.
-
1a1. MoneyGoWhere shows an error message.
Use case resumes at step 1.
-
UC08 Generate statistics
MSS
-
User requests to generate statistics for a specific date range.
-
MoneyGoWhere generates statistical analysis such as total spending of each tag.
Use case ends.
Extensions
-
1a. The given date range is invalid.
-
1a1. MoneyGoWhere shows an error message.
Use case resumes at step 1.
-
UC09 List all tags
MSS
-
User requests to list all the recorded tags.
-
MoneyGoWhere lists all the recorded tags.
Use case ends.
UC10 Add a reminder
MSS
-
User enters a reminder.
-
MoneyGoWhere adds the specified reminder inside the list of reminders.
Use case ends.
UC11 Delete a reminder
MSS
-
User requests to view the list of spending.
-
MoneyGoWhere shows a list of spending.
-
User requests to delete a specific spending from the list.
-
MoneyGoWhere deletes the reminder. Use case ends.
Extensions
-
2a. The list is empty.
Use case ends.
-
3a. The given index is invalid.
-
3a1. MoneyGoWhere shows an error message.
Use case resumes at step 2.
-
UC12 Import external data from a Csv file
MSS
-
User requests to import data from Csv file by specifying the file path.
-
MoneyGoWhere imports the data from the Csv file located at specified file path.
Use case ends.
Extensions
-
1a. The file path is invalid.
-
1a1. MoneyGoWhere shows an error message.
Use case resumes at step 1.
-
UC13 Export data to a Csv file
MSS
-
User requests to export data to a Csv file by specifying the folder path.
-
MoneyGoWhere exports the data into
moneygowhere.csvfile located at specified folder path.Use case ends.
Extensions
-
1a. The file path is invalid.
-
1a1. MoneyGoWhere shows an error message.
Use case resumes at step 1.
-
UC14 Undo a command
MSS
-
User requests to undo a command.
-
MoneyGoWhere restores the list of spending to the state before the previous command was executed.
Use case ends.
Extensions
-
1a. There are no undo commands executed previously.
-
1a1. MoneyGoWhere shows an error message.
Use case ends.
-
UC15 Redo a command
MSS
-
User requests to redo a command.
-
MoneyGoWhere executes the previous command that was undone.
Use case ends.
Extensions
-
1a. There are no undo commands executed previously.
-
1a1. MoneyGoWhere shows an error message.
Use case ends.
-
UC16 Graphing the data
MSS
-
User requests to display spending in the form of a graph for a specific date range.
-
MoneyGoWhere displays spending in graph form.
Use case ends.
Extensions
-
1a. The given date range is invalid.
-
1a1. MoneyGoWhere shows an error message.
Use case resumes at step 1.
-
UC17 Clear all spending
MSS
-
User requests to clear all entries in the list of spending.
-
MoneyGoWhere deletes all spending entries.
Use case ends.
Extensions
-
1a. The list of spending is empty.
-
1a1. MoneyGoWhere shows an error message.
Use case ends.
-
UC18 View exchange rates
MSS
-
User requests to view exchange rates
-
MoneyGoWhere shows all exchange rates available for supported currencies.
Use case ends.
Extensions
-
1a. There is an amount and currency specified.
-
1a1. MoneyGoWhere converts the amount and currency specified to SGD.
Use case ends.
-
-
1b. The amount is invalid or the currency entered does not exist.
-
1b1. MoneyGoWhere shows an error message.
Step 1b1 is repeated until the amount and currency entered is correct.
Use case resumes from step 1a.
-
UC19 Set the displayed currency
MSS
-
User requests to set the displayed currency
-
MoneyGoWhere displays the specified currency for all spending in the list.
Use case ends.
Extensions
-
1a. There is no currency specified.
-
1a1. MoneyGoWhere shows the current currency used.
Use case ends.
-
-
1b. The currency entered does not exist.
-
1b1. MoneyGoWhere shows an error message.
Step 1b1 is repeated until the currency entered is correct.
Use case resumes from step 1.
-
Appendix D: Non Functional Requirements
-
Should work on any mainstream OS as long as it has Java
11or above installed. -
Should be able to hold up to 1000 spending without a noticeable sluggishness in performance for typical usage.
-
A user with above average typing speed for regular English text (i.e. not code, not system admin commands) should be able to accomplish most of the tasks faster using commands than using the mouse.
-
Should not require user to install.
-
Features implemented should be testable using automated and manual testing.
-
Should work for a single user only.
-
Should be able to run with or without internet connection.
Appendix E: Glossary
- Budget
-
The maximum amount of money set by the user to spend.
- Cost
-
Money spent by the user.
- Csv
-
Comma-separated values.
- Deficit
-
The user has spent more than his budget set.
- Mainstream OS
-
Windows, Linux, Unix, OS-X.
- Safe
-
The user has spent less or equal to his budget set.
- Spending
-
An expense incurred by the user.
Appendix F: Instructions for Manual Testing
Given below are instructions to test the app manually.
| These instructions only provide a starting point for testers to work on; testers are expected to do more exploratory testing. |
F.1. Launch and Shutdown
-
Initial launch
-
Download the jar file and copy into an empty folder
-
Double-click the jar file
Expected: Shows the GUI with a set of sample spending. The window size will be maximised according to your window size.
-
F.2. Deleting a Spending
-
Deleting a spending while all spending are listed
-
Prerequisites: List all Spending using the
listcommand. Multiple spending in the list. -
Test case:
delete 1
Expected: First spending is deleted from the list. Details of the deleted spending shown in the results display. -
Test case:
delete 0
Expected: No spending is deleted. Error details shown in the results display. -
Other incorrect delete commands to try:
delete,delete x(where x is larger than the list size) {give more}
Expected: Similar to previous.
-
F.3. Finding a Spending
-
Finding a spending from the list
-
Prerequisites: The spending list should not be empty.
-
Test case:
find n/Apple Bubble Tea
Expected: Spending entries that have names matchingApple,BubbleorTeaare listed. -
Test case:
find d/yesterday d/today
Expected: Spending entries dated yesterday and today are listed.
-
F.4. Sorting Displayed Spending
-
Sorting displayed spending in the list
-
Prerequisites: The spending list should not be empty. It is preferred to use the
listcommand first. -
Test case:
sort n/ASC
Expected: Spending entries are sorted by Name in Ascending order. -
Test case:
sort d/DESC n/ASC
Expected: Spending entries are sorted in Date
-
F.5. Changing the Displayed Currency
-
Changing the displayed currency in the application
-
Prerequisites: The currency should be in SGD and the spending list should have some items to display the full capability of this function as well.
-
Test case:
currency USD
Expected: The application currency is changed to USD. -
Test case:
currency SGD
Expected: If the application was in SGD, an error message is shown saying that SGD is the currency in use.
-
F.6. Viewing Exchange Rate or Conversion Rate
-
Views the exchange rate of all currencies, or converts a particular currency to SGD
-
Test case:
exchangerate 5 USD
Expected: 5 USD is converted to SGD based on stored exchange rates and its equivalent amount is displayed. -
Test case:
exchangerate
Expected: All exchange rates stored by the application are displayed.
-
F.7. Adding a Reminder
-
Adding a reminder into the reminder list
-
Test case:
reminder add d/tomorrow m/Pay school fee
Expected: A reminder to pay school fee by tomorrow, is added into the current reminder list and success message together with the details of newly added reminder is shown in the results display. -
Test case:
reminder add m/Pay phone bill
Expected: No reminder is added. Error details shown in the results display. -
Test case:
reminder add d/todayExpected: No reminder is added. Error details shown in the results display.
-
F.8. Deleting a Reminder
-
Deleting a reminder while there is at least one reminder
-
Prerequisites: There is at least one reminder in the reminder list being displayed on the User Interface.
-
Test case:
reminder delete 1
Expected: First reminder is deleted from the reminder list. Details of the deleted reminder shown in the display. -
Test case:
reminder delete 0
Expected: No reminder is deleted. Error details shown in the results display. -
Other incorrect delete reminder commands to try:
reminder delete,reminder delete x(where x is larger than the list size) {give more}
Expected: Similar to previous.
-
F.9. Importing Spending Data
-
Importing valid spending while all spending are listed
-
Prerequisites: Prepare a valid Csv file following the Csv constraints.
-
Test case:
import p/./moneygowhere.csv
Expected: All valid spending will be added to the spending list.
-
-
Importing partially valid spending data while all spending are listed
-
Prerequisites: Prepare a Csv file with some valid spending and some invalid spending such as a spending with empty
name,costordateparameter. -
Test case:
import p/./moneygowhere.csv
Expected: Only valid spending will be added to the spending list, whereas error details specifying which spending is invalid will be shown in the results display.
-
F.10. Exporting Spending Data
-
Exporting all spending into
moneygowhere.csvfile-
Test case:
export p/.
Expected: All spending data will be exported into amoneygowhere.csvfile at whichever folder the jar file is. -
Test case:
export p/C:\Users\user\Documents\MoneyGoWhere
Expected: All spending data will be exported intoC:\Users\user\Documents\MoneyGoWhere\moneygowhere.csv.
-
F.11. Showing Statistics
-
Showing statistics based on spending listed in MoneyGoWhere
-
Prerequisites: There should be existing spending with tags in MoneyGoWhere.
-
Test case:
stats
Expected: Tab switches to Statistics tab if not already showing. MoneyGoWhere will display statistics for all spending. If there are no spending to be displayed, MoneyGoWhere will display a message showing that there is no data to show. -
Test case:
stats d/last week d/today
Expected: Tab switches to Statistics tab if not already showing. MoneyGoWhere will display statistics for spending that fall between last week and today. If there are no spending in the date range to be displayed, MoneyGoWhere will display a message showing that there is no data to show.
-
F.12. Showing Graph
-
Showing graph based on spending listed in MoneyGoWhere
-
Prerequisites: There should be existing spending with varying dates in MoneyGoWhere.
-
Test case:
graph
Expected: Tab switches to Graph tab if not already showing. MoneyGoWhere will display graph for all spending. If there are no spending to be displayed, an empty graph is shown. -
Test case:
graph d/last week d/today
Expected: Tab switches to Graph tab if not already showing. MoneyGoWhere will display graph for spending that fall between last week and today. If there are no spending in the date range to be displayed, an empty graph is shown.
-
F.13. Setting a New Budget
-
Setting a new budget for the current month
-
Test case:
budget 1000
Expected: The budget will be set to 1000, which can be seen in the Graphical User Interface
-
F.14. Viewing Previous Commands
-
Traversing previous commands using the up key
-
Prerequisites: There should be at least one existing command previously executed.
-
Test case: Press
upkey
Expected: The previous command will be shown in the command box.
-
F.15. Viewing Next Commands
-
Traversing next commands using the down key
-
Prerequisites: There should be at least two existing command previously executed and user has pressed the up key twice.
-
Test case: Press
downkey
Expected: The most recent command will be shown in the command box.
-